Blender MCP Tutorial Center
Learn how to configure and use Blender MCP through these detailed guides to create your AI-powered 3D creation workflow
- Getting Started
- Minecraft Modeling
- MCP Integrations
- Advanced Topics
Getting Started with Blender MCP

Step 1: Download and Install Blender MCP
First, you need to download Blender MCP from GitHub and install it in your Blender application:
- Visit the Blender MCP GitHub repository to download the latest version
- In Blender, go to Edit > Preferences > Add-ons > Install
- Select the downloaded .zip file and activate the plugin
Step 2: Get an API Key
Blender MCP requires an API key from an AI model provider to function. You have several options:
- Claude API: Visit Anthropic to register and obtain a Claude API key
- OpenRouter: Visit OpenRouter to register and get an API key that provides access to multiple AI models
- Free Options: Use free models provided by OpenRouter (see the "Advanced Topics" tab)
Step 3: Configure the MCP Server
In the config.py file, you need to configure your API key:
# Modify the config.py file
API_KEY = "Your OpenRouter or Claude API Key"
API_BASE = "https://openrouter.ai/api/v1"  # If using OpenRouter
# Or
API_BASE = "https://api.anthropic.com/v1"  # If using Claude directly
⚠️ Important: Only run one MCP server instance (in Cursor, Windsurf, VSCode, or Claude Desktop), not multiple instances simultaneously
Step 4: Installing the Blender Plugin
Important: Upgrading from Previous Version
If you have previously installed Blender MCP, you need to uninstall it first:
- Open Blender and go to Edit > Preferences > Add-ons
- Find and disable "Interface: Blender MCP" by unchecking the box
- Click the downward arrow next to it, then click "Remove"
- Restart Blender before installing the new version
- Download the latest version of Blender MCP
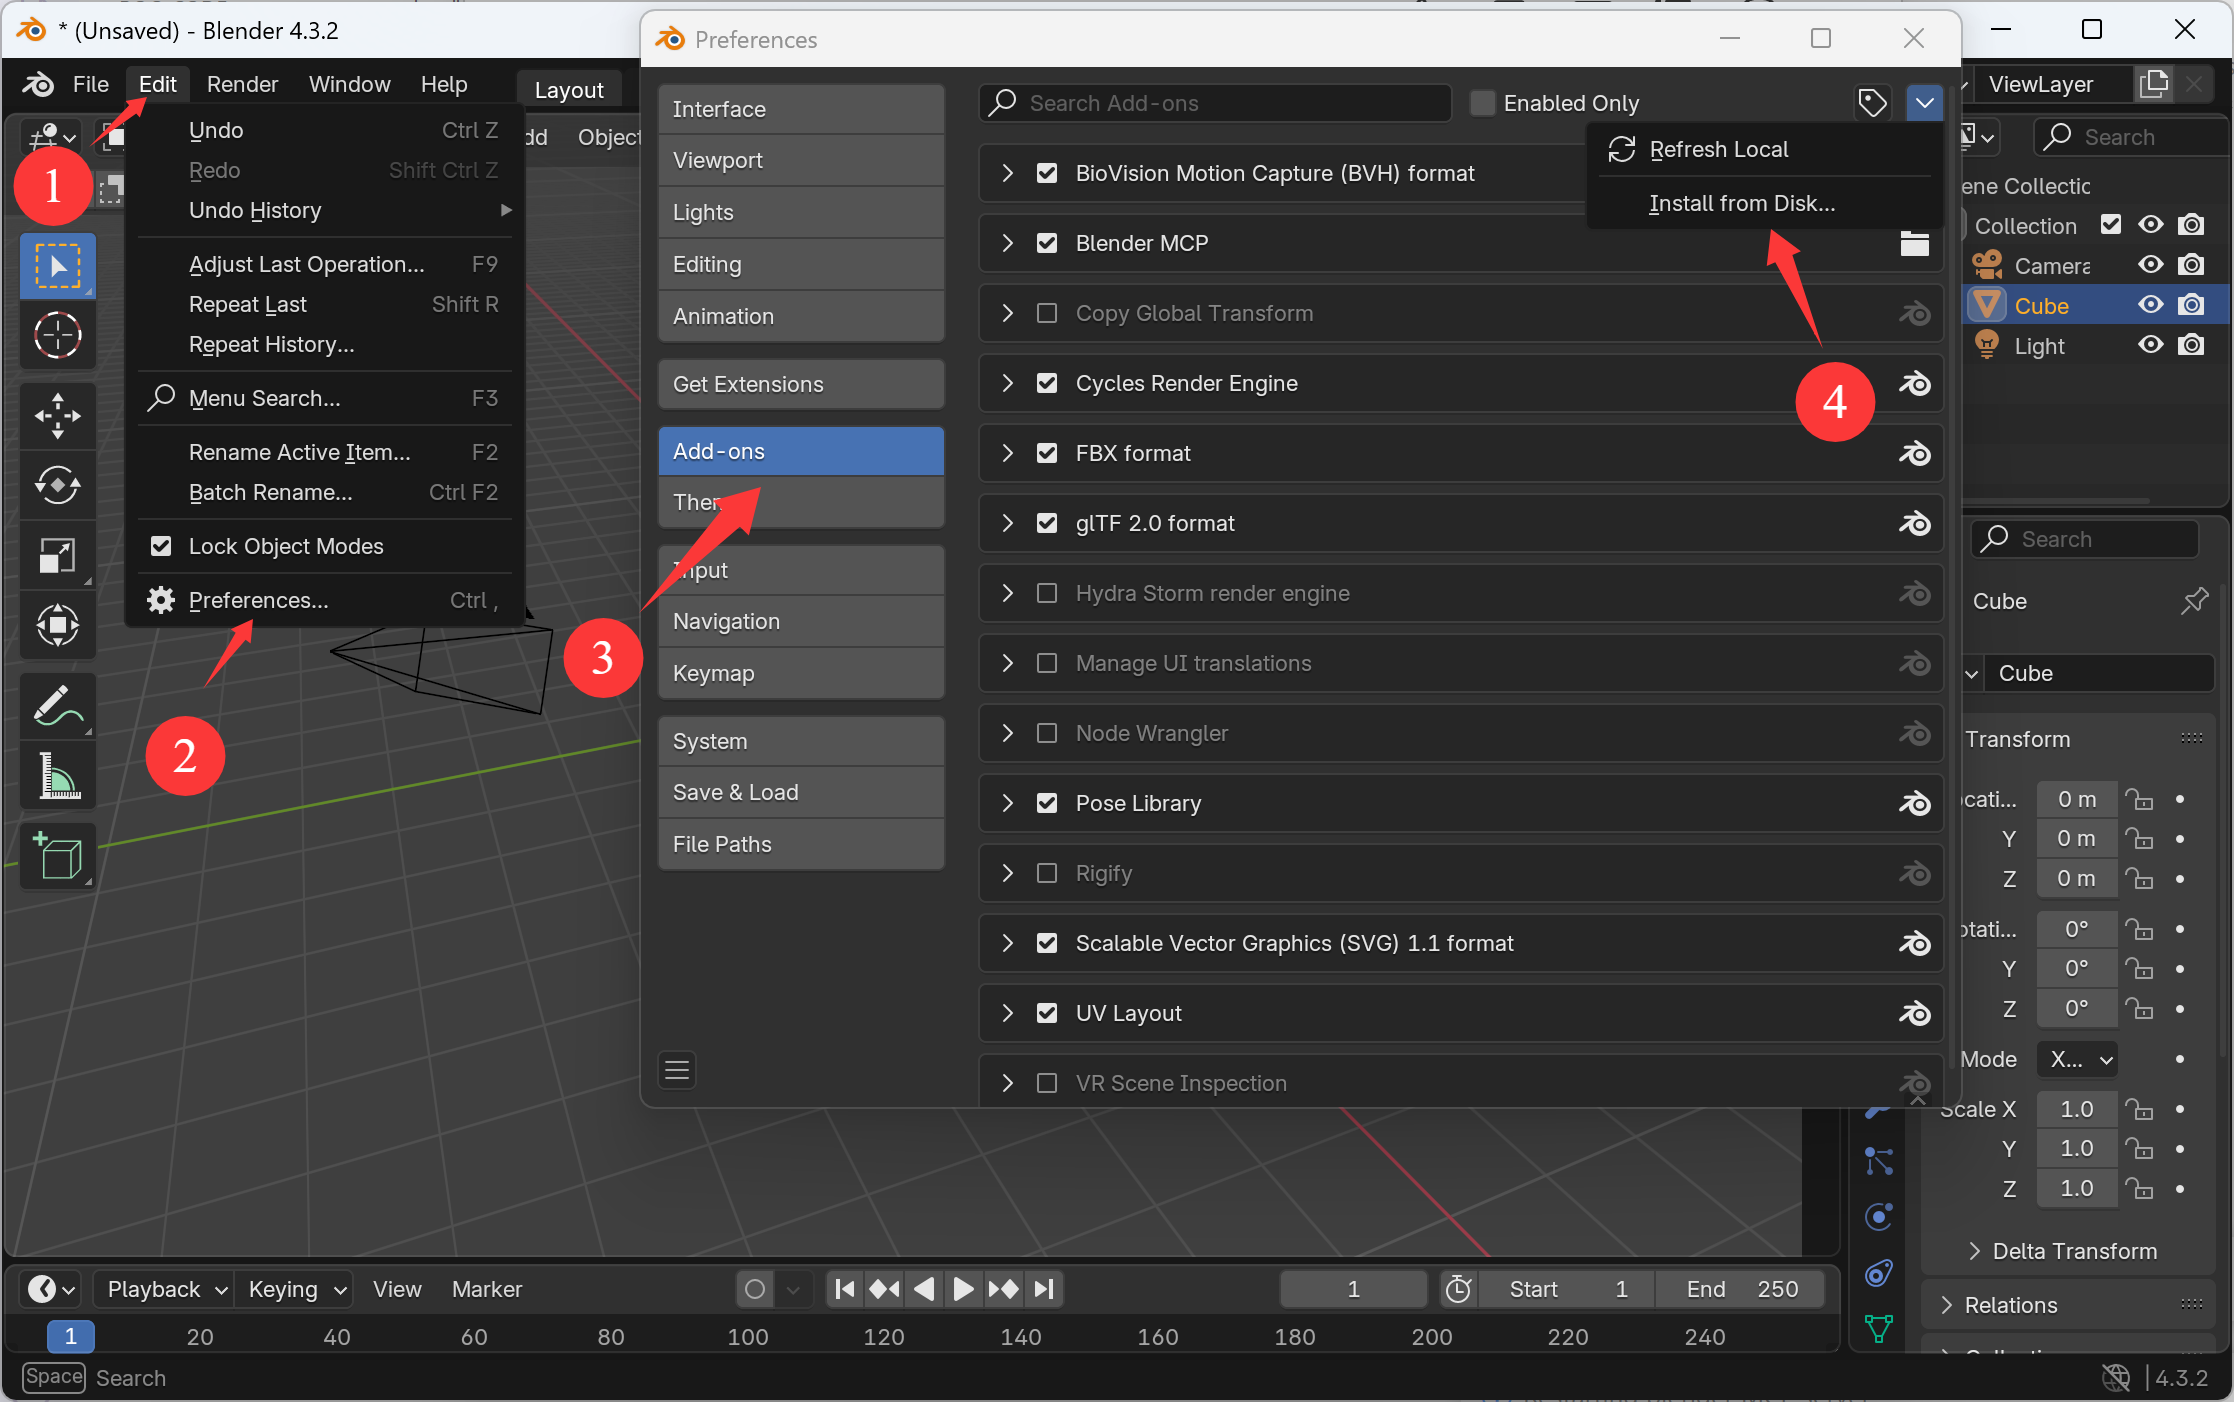
- Open Blender
- Go to Edit > Preferences > Add-ons
- Click "Install..." and select the
addon.pyfile - Enable the plugin by checking the box next to "Interface: Blender MCP"
Installing the Blender MCP addon
Configuring the Blender MCP addon
Step 5: Start the MCP Server
Run the following command to start the MCP server:
python server.pyThe server will start and listen on the default port. You should see output similar to the following:
INFO:     Started server process [12345]
INFO:     Waiting for application startup.
INFO:     Application startup complete.
INFO:     Uvicorn running on http://127.0.0.1:8000 (Press CTRL+C to quit)
Step 6: Using Blender MCP
Starting the Connection
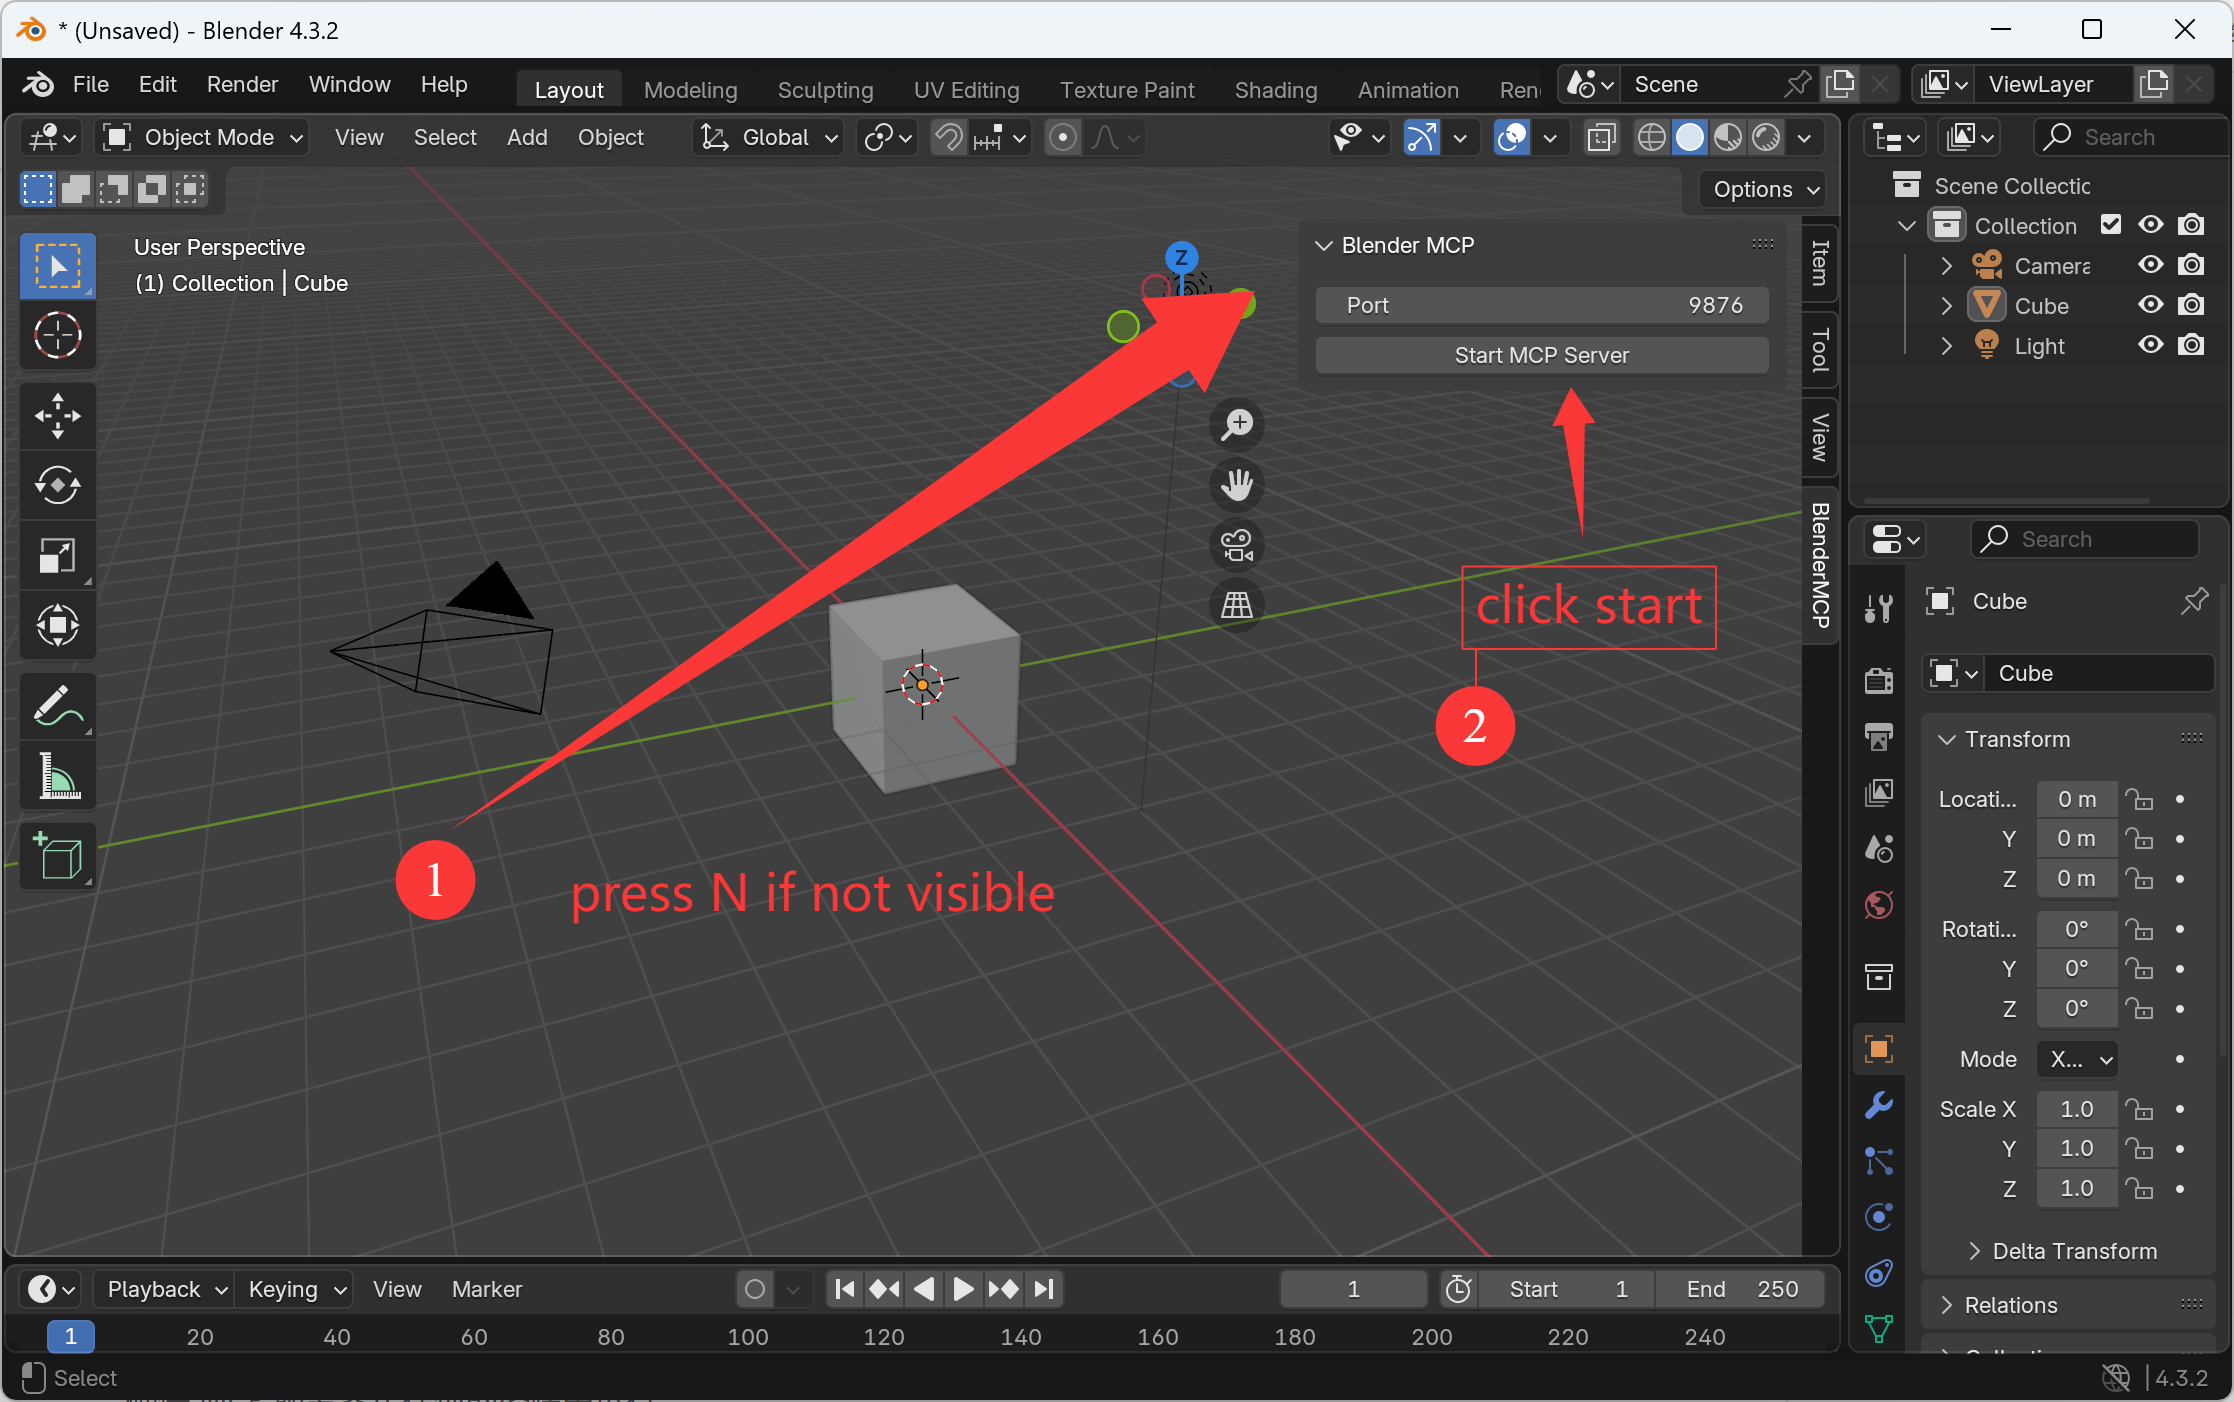
- In Blender, go to the 3D View sidebar (press N if not visible)
- Find the "BlenderMCP" tab
- Check the Poly Haven checkbox if you want to use Poly Haven assets (optional)
- Click "start mcp server"
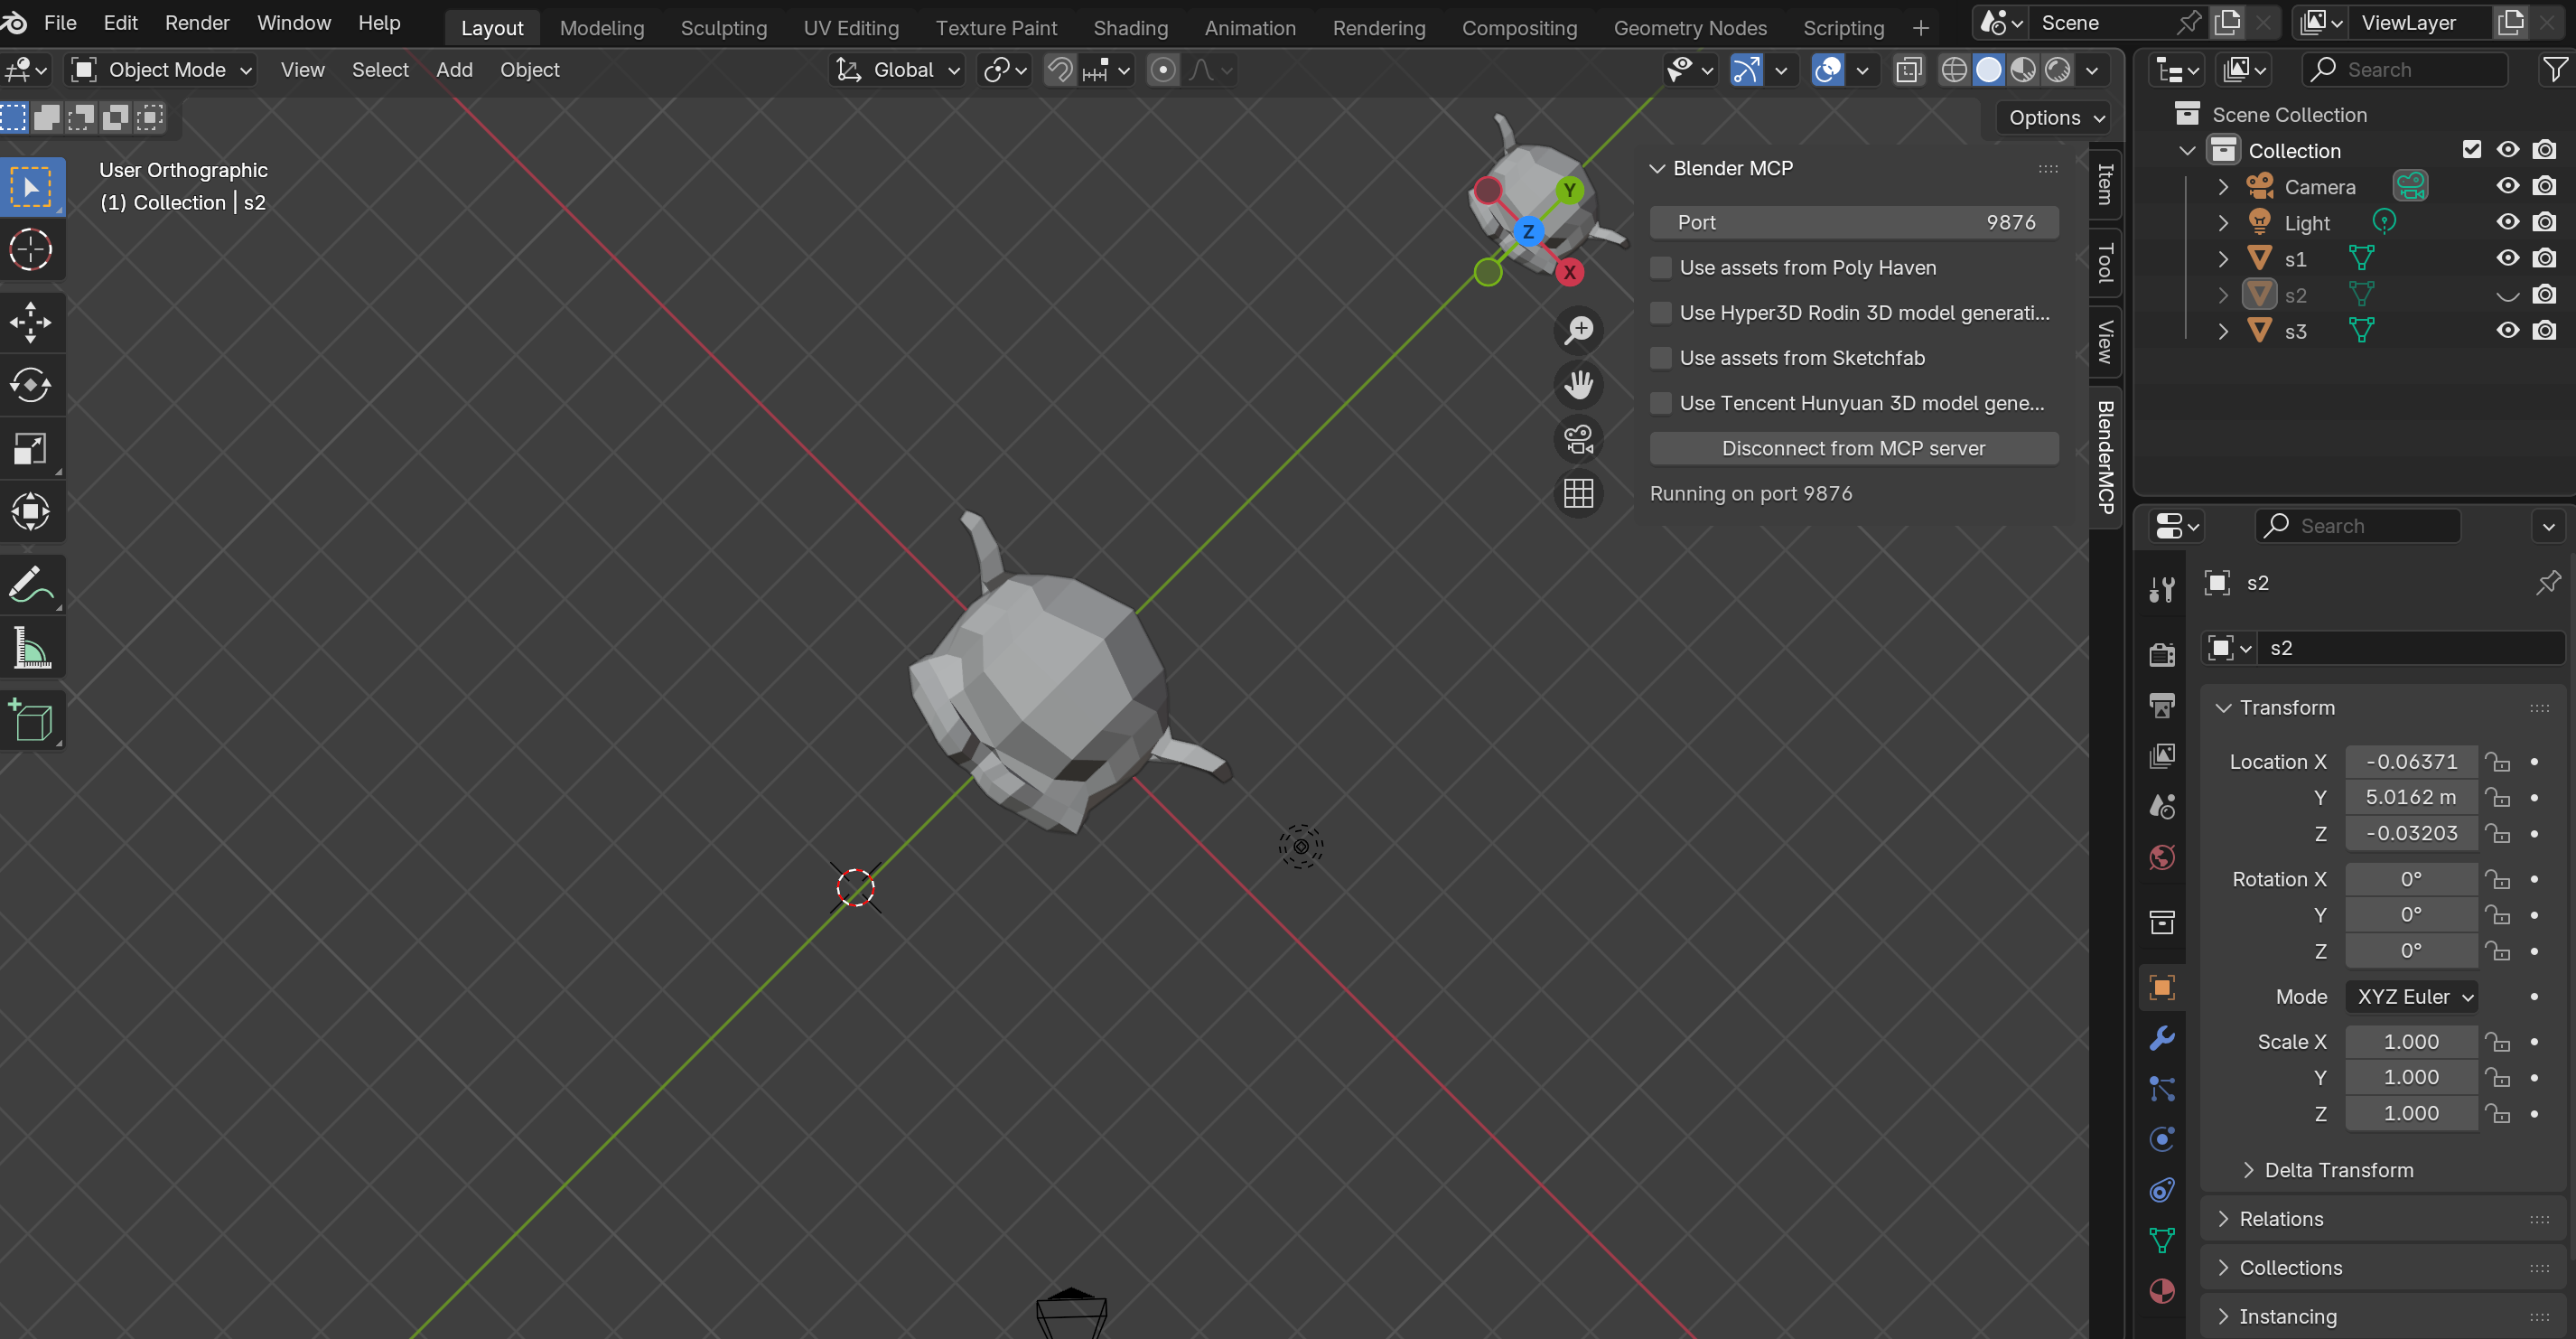
- Make sure the MCP server is running in your terminal
Using with Claude
Once the config file is set up in Claude and the plugin is running in Blender, you'll see a hammer icon with Blender MCP tools.
Example Commands
- "Create a low poly scene in a dungeon, with a dragon guarding a pot of gold"
- "Create a beach vibe using HDRIs, textures, and models like rocks and vegetation from Poly Haven"
- "Get information about the current scene, and make a threejs sketch from it"
- "Make this car red and metallic"
- "Create a sphere and place it above the cube"
- "Make the lighting like a studio"
- "Point the camera at the scene, and make it isometric"
Step 7: Learn Blender Basics with MCP
Now that you have Blender MCP installed and running, it's time to learn the fundamentals of Blender. We've prepared a comprehensive tutorial series to help you master Blender from scratch.

Troubleshooting
- Connection Errors: Ensure the MCP server is running and check the API endpoint settings in the plugin
- API Key Errors: Verify that the API key you entered in config.py is correct
- Plugin Not Showing: Check if the plugin is properly installed and activated
Minecraft Modeling with Blender MCP

Create Stunning Minecraft-Style 3D Scenes
Create stunning Minecraft-style 3D scenes in just 10 minutes using natural language prompts, even with no prior Blender experience.
What You'll Learn:
- Create natural terrain with Perlin noise
- Design Minecraft-style buildings
- Add trees, rivers, and weather effects
- Use the MCPrep plugin for authentic Minecraft assets
- Model Minecraft characters like Alex
Requirements:
- Blender with MCPrep plugin
- Blender MCP setup
- No prior experience needed!
Step 1: Install MCPrep Plugin
First, you need to install the MCPrep plugin to access Minecraft assets in Blender:
- Download the MCPrep plugin from theduckcow.com
- In Blender, go to Edit > Preferences > Add-ons > Install
- Select the downloaded .zip file and activate the plugin
- Enable the plugin by checking the box next to "MCPrep"
Step 2: Set Up Blender MCP
Make sure Blender MCP is properly set up and connected to your AI model of choice:
- Follow the steps in the "Getting Started" section to install and configure Blender MCP
- Start the MCP server
- Connect Blender to the MCP server
Step 3: Creating Minecraft Terrain
Use natural language prompts to create Minecraft-style terrain:
Example prompts:
"Create a Minecraft-style terrain with hills and a valley"
"Add a river flowing through the terrain"
"Create a forest with Minecraft-style trees"
Blender MCP will generate Python code to create procedural terrain using Perlin noise and other techniques to achieve that distinctive Minecraft look.
Step 4: Building Minecraft Structures
Create buildings and structures with these example prompts:
Example prompts:
"Build a small Minecraft house with wood and stone"
"Create a castle with towers and a moat"
"Add a mine entrance with torches"
Step 5: Adding Characters and Details
Enhance your scene with characters and details:
Example prompts:
"Add a Minecraft character like Steve near the house"
"Place some farm animals around the area"
"Add some furniture inside the house"Other MCP Integrations
Combining Blender MCP with Server-Sequential-Thinking
Enhance your 3D modeling workflow by combining Blender MCP with other MCP tools like server-sequential-thinking. This powerful combination allows for complex modeling tasks with step-by-step planning and execution.
Integration Benefits:
- Break down complex modeling tasks into sequential steps
- Improve planning and execution of detailed 3D models
- Monitor and modify each step for optimal results
- Create more sophisticated structures with better organization
Example Workflow: Creating a High-Rise Building
Here's an example of how to use server-sequential-thinking with Blender MCP to create a complex high-rise building model:
Prompt: "I want to use Blender to create a high-rise building. Please use server-sequential-thinking tool to help me generate all the operation steps, then use blender-mcp to execute the generation. Remember to monitor each modification, and if there's anything unreasonable, make timely adjustments. Please also add a larger pavilion next to the existing one."How It Works:
- Planning Phase (server-sequential-thinking): The sequential thinking server breaks down the complex task into logical steps:
- Step 1: Create the base structure of the high-rise building
- Step 2: Add floors and windows to the building
- Step 3: Design the roof structure
- Step 4: Create the existing pavilion
- Step 5: Add a larger pavilion next to the existing one
- Step 6: Add environmental details and finishing touches
- Execution Phase (blender-mcp): Blender MCP executes each step with appropriate Python code
- Monitoring Phase: The system checks each modification for quality and makes adjustments as needed
Tool Comparison
| Feature | Blender MCP | Server-Sequential-Thinking |
|---|---|---|
| Primary Function | 3D model execution in Blender | Step-by-step planning and reasoning |
| Strengths | Direct model manipulation | Complex task breakdown |
| Best Used For | Creating and modifying 3D objects | Planning complex modeling workflows |
Setting Up the Integration
- Install server-sequential-thinking from GitHub
- Configure it with your preferred LLM
- Connect it to Blender MCP via API
- Start using step-by-step planning for complex 3D modeling tasks
Advanced Topics
VSCode with Roo Code Configuration
VSCode integration with Roo Code allows you to interact with Blender MCP using an in-editor AI assistant:
- Install the Roo Code extension in VSCode
- Configure your API key (OpenRouter, Claude, or other supported providers)
- Connect to the Blender MCP server
- Use the chat interface to send natural language instructions to Blender
This setup allows you to send natural language instructions directly to Blender from VSCode, leveraging powerful language processing capabilities.
View Full VSCode Configuration TutorialDeepSeek Integration
Blender MCP supports not only Claude but also other large language models like DeepSeek R1:
- Get access to DeepSeek R1 through OpenRouter.ai
- Select the DeepSeek model in your configuration
- Leverage DeepSeek's powerful capabilities for 3D modeling
Free Usage Options
You can use Blender MCP for free with these methods:
Option 1: Using OpenRouter's Free Models
- Visit OpenRouter.ai and create an account
- Get your API key (new accounts come with some free credits)
- Configure your API key and OpenRouter's API base URL in config.py
- Choose free models such as:
- google/gemini-2.0-flash-thinking-exp:free
- deepseek/deepseek-r1-distill-llama-70b:free
- qwen/qwen2.5-vl-72b-instruct:free
Option 2: Running Models Locally with Ollama
- Install Ollama: Download and install Ollama from the official Ollama website (supports Windows, MacOS, and Linux)
- Run the Ollama service (default port is localhost:11434)
- Pull a model: Run
ollama pull <model-name>in the command line to download your desired model, e.g.,ollama pull llama3orollama pull qwen2.5:7b - Verify the model: Ensure the model was successfully downloaded by running
ollama list - Configure Roo Code: Install the Roo Code extension in Visual Studio Code, open Roo Code settings, select "Ollama" as the API provider, and ensure the Base URL is set to
http://localhost:11434(Ollama's default address) - Enter your downloaded model name (e.g., qwen2.5:7b or whatever model you pulled)
- Test the connection: Type a simple task in the Roo Code chat interface (e.g., "write a Python code") to check if it responds correctly
Ready to Start Using Blender MCP?
Transform your creative workflow with AI-enhanced 3D modeling