Blender Basics
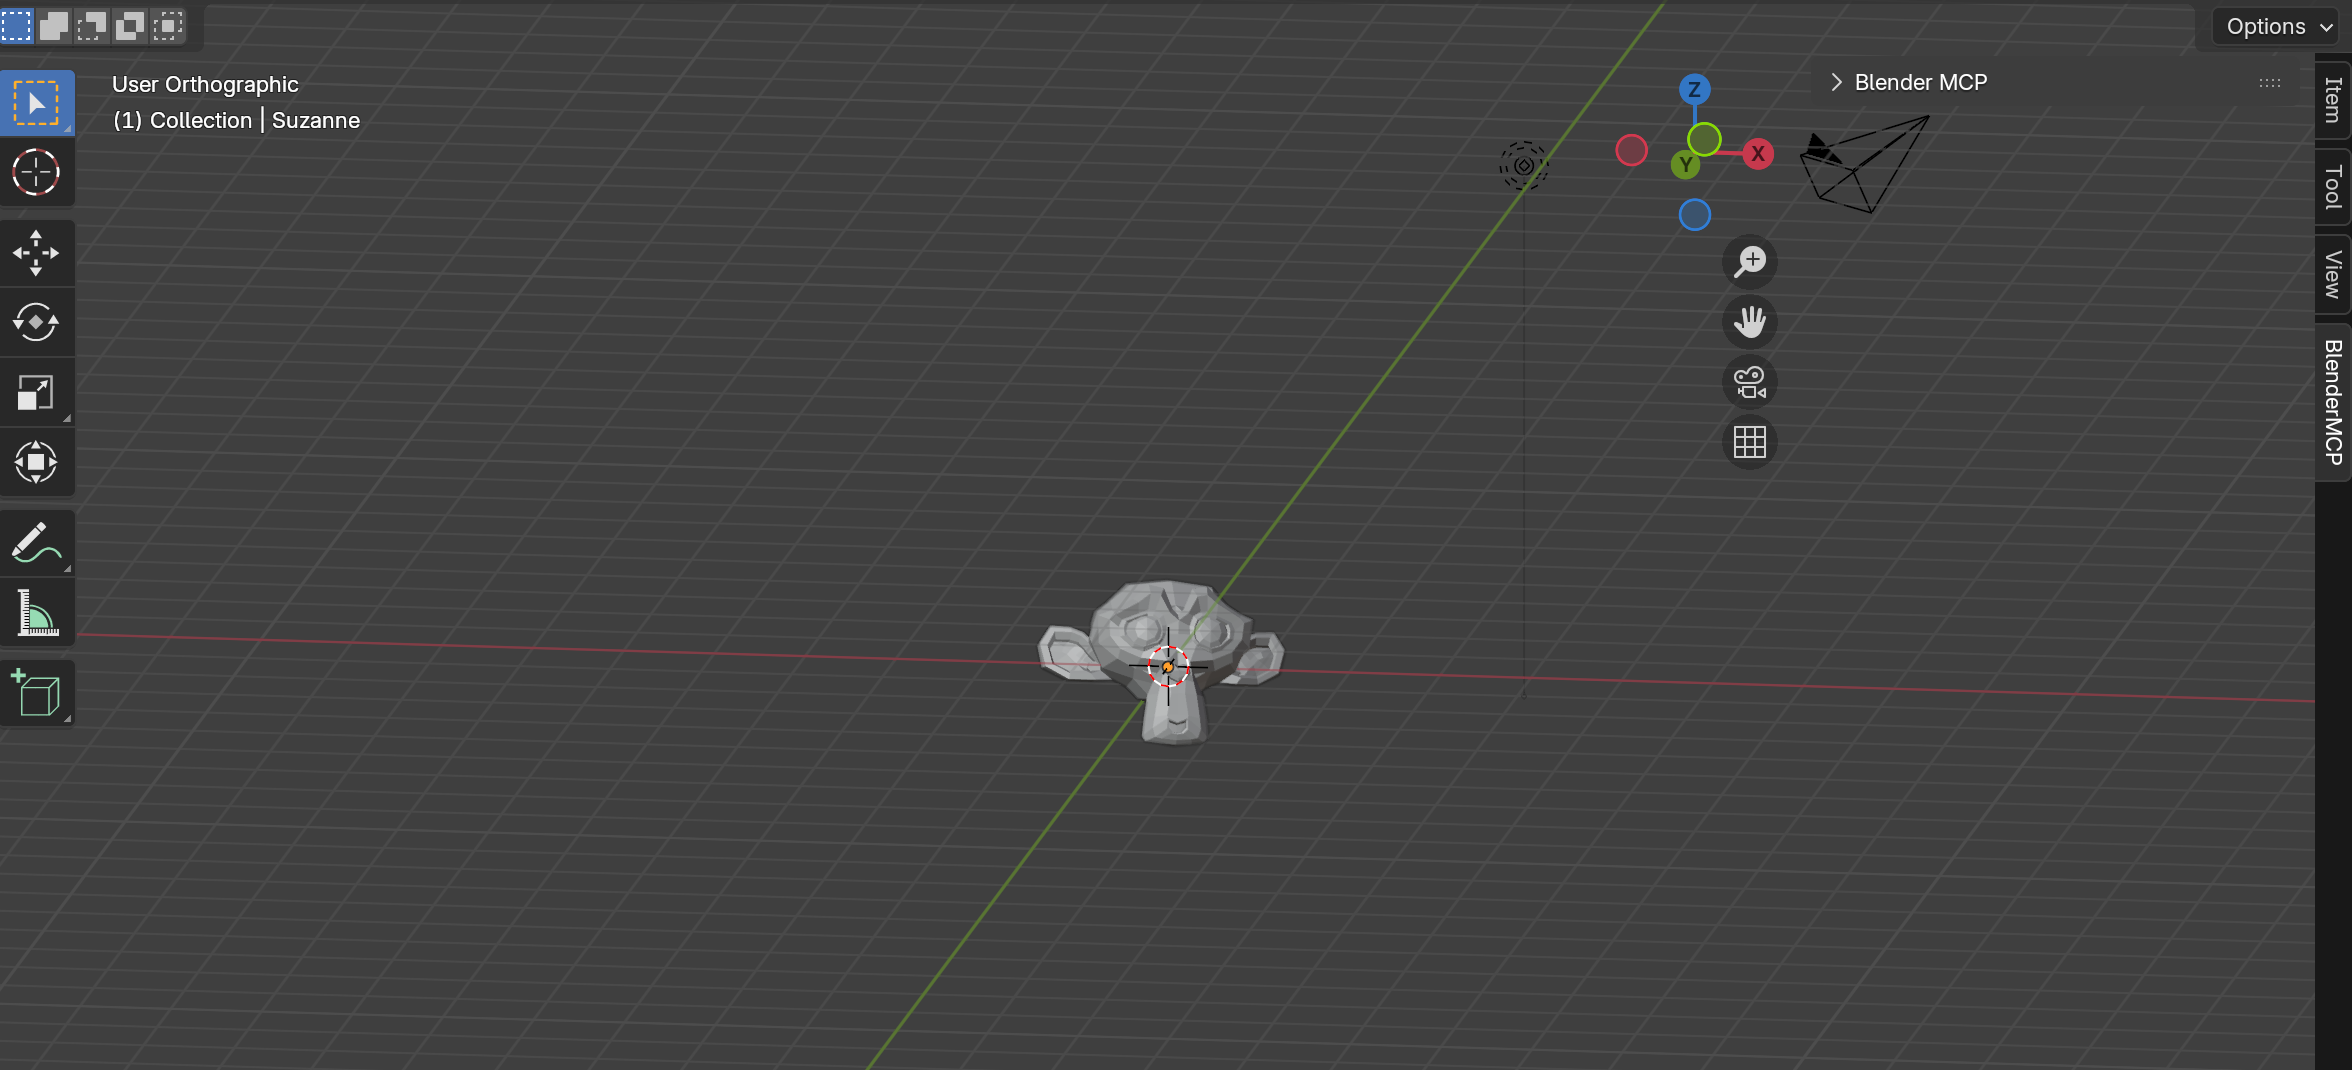
Blender Basics Part 1: Getting Started
Master viewport navigation, object control, and view switching — make Blender obey your commands with traditional workflows and MCP.
Read Article
Blender MCP connects Claude AI to Blender, allowing you to create, modify, and enhance 3D models through simple text prompts.
Blender MCP also supports built-in Blender plugins, viewport screenshots, and Sketchfab integration, enhancing your 3D modeling capabilities with native tools and seamless sharing options.

Create and modify 3D objects in Blender using natural language instructions with Claude AI.
Run arbitrary Python code in Blender through simple text prompts for advanced customization.
Apply and modify materials with AI assistance for stunning visual results.
Adjust camera positions, lighting, and scene properties with natural language commands.
Access and use Polyhaven assets directly through AI commands for enhanced 3D scenes.
Seamless installation process and compatibility with Blender across multiple platforms.
Capture high-quality screenshots of your 3D viewport directly through AI commands for documentation and sharing.
Seamlessly upload and share your 3D models to Sketchfab platform directly from Blender through natural language instructions.
Install uv on Windows:
pip install uv
Install uv on Mac:
brew install uv
⚠️ Please install UV before proceeding
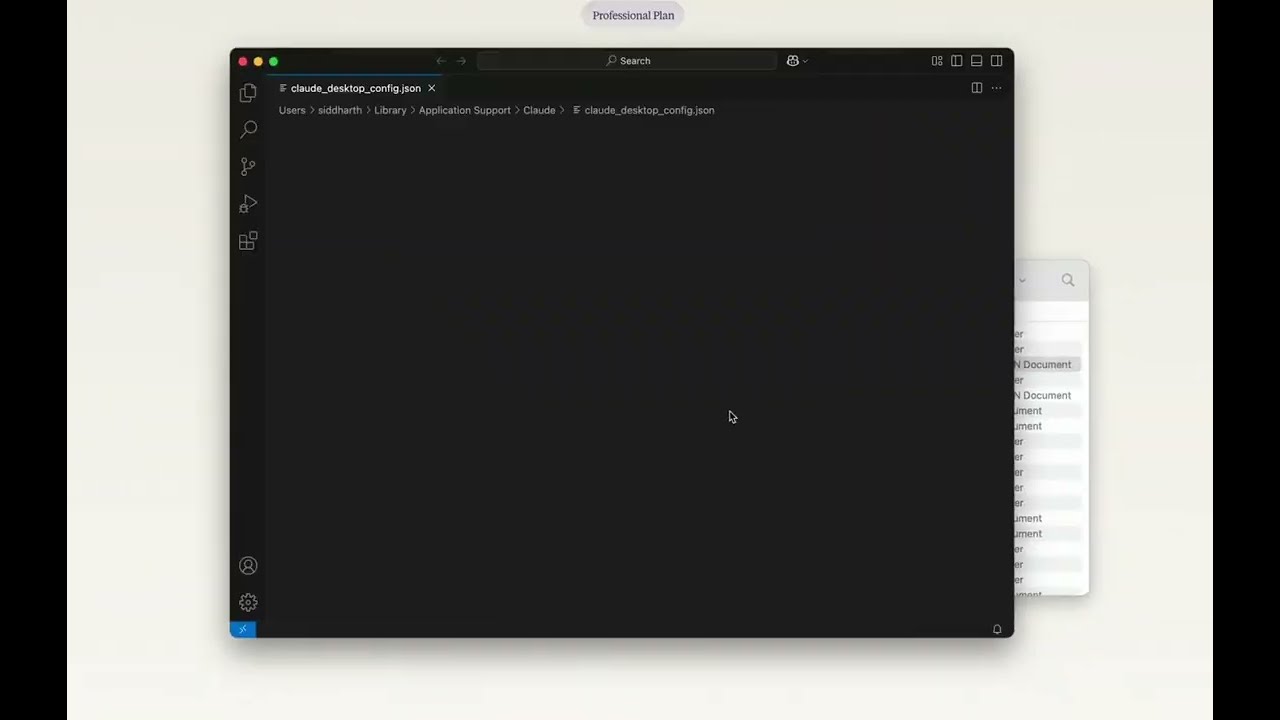
Go to Claude > Settings > Developer > Edit Config > claude_desktop_config.json and add the following:
{
    "mcpServers": {
        "blender": {
            "command": "uvx",
            "args": [
                "blender-mcp"
            ]
        }
    }
}
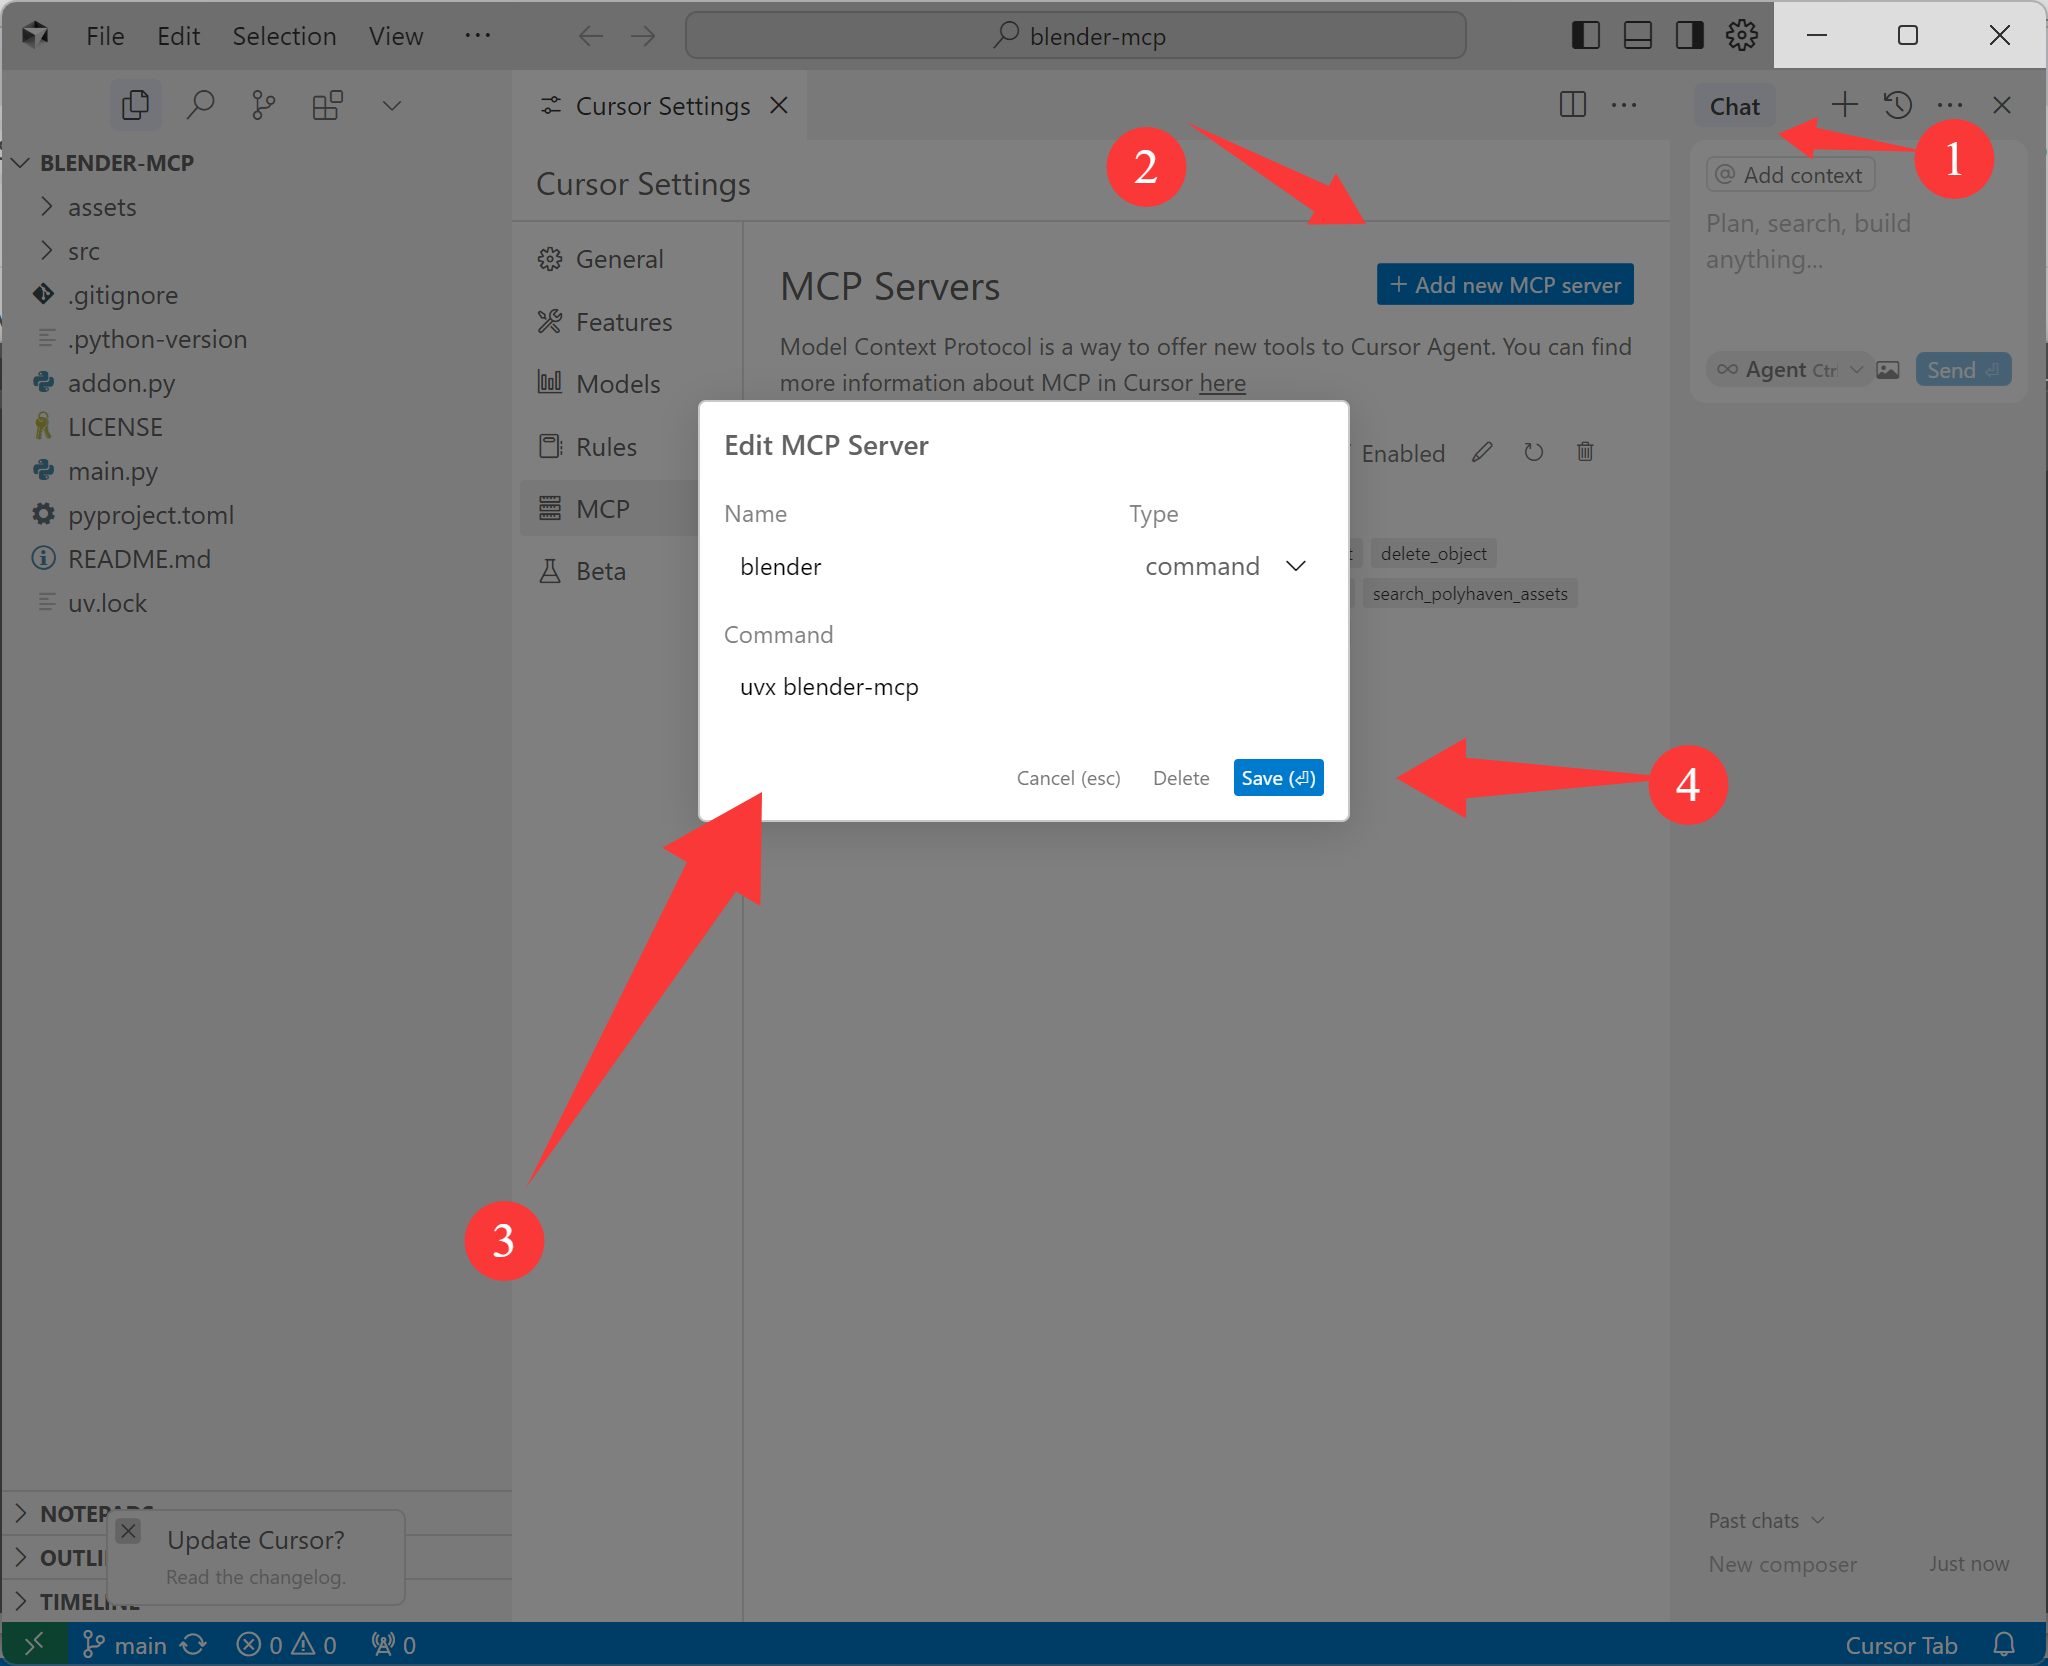
Go to Cursor Settings > MCP and paste the following command:
uvx blender-mcp
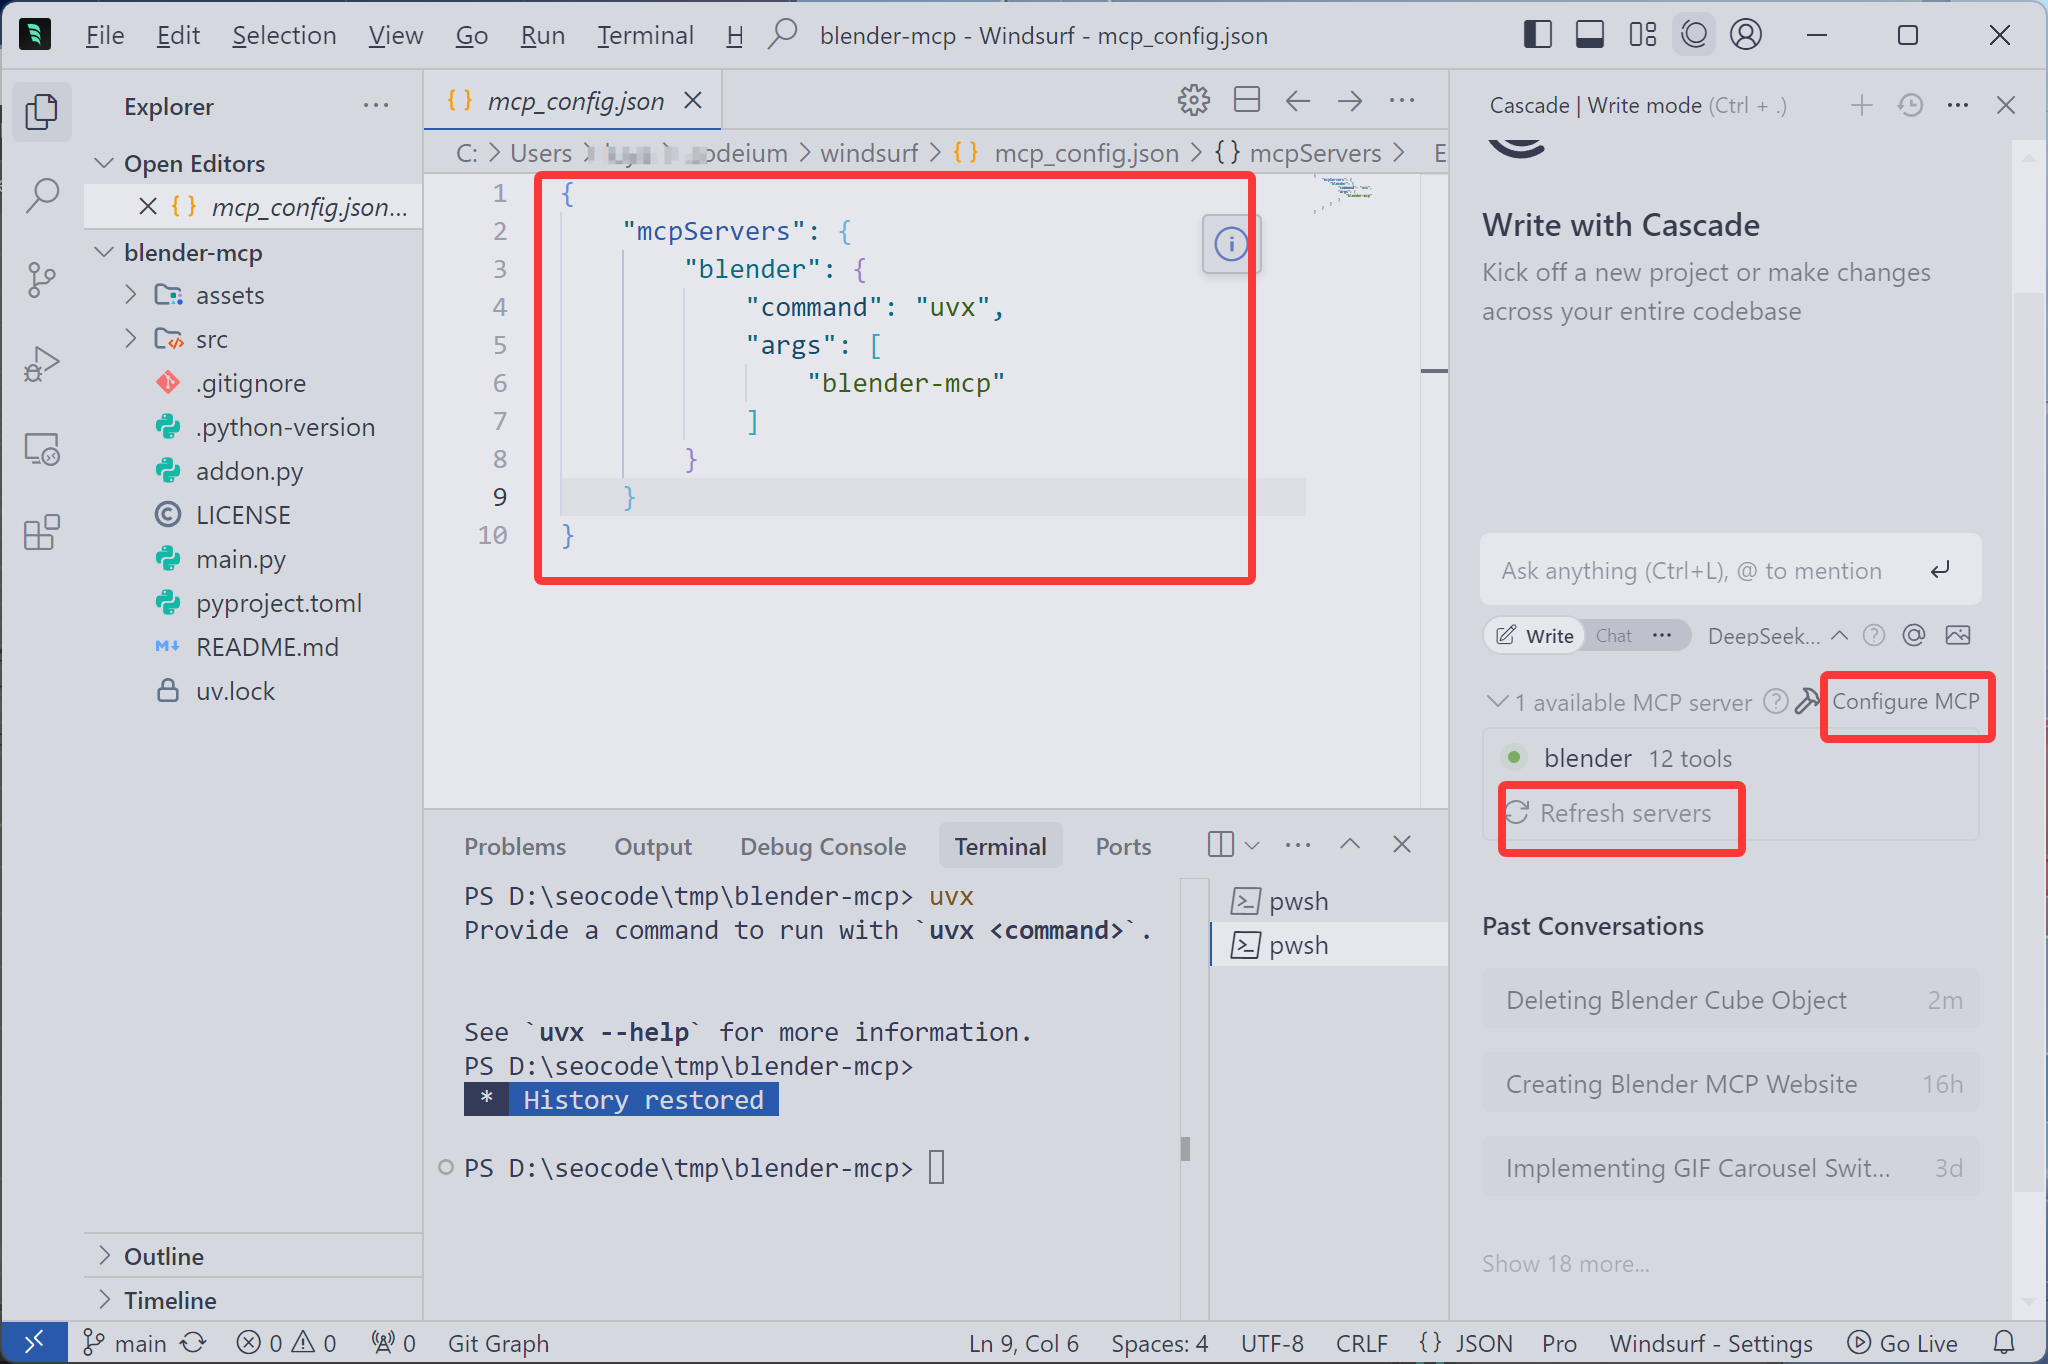
In Windsurf, the MCP server is pre-configured. Just enable the plugin in Blender and connect.
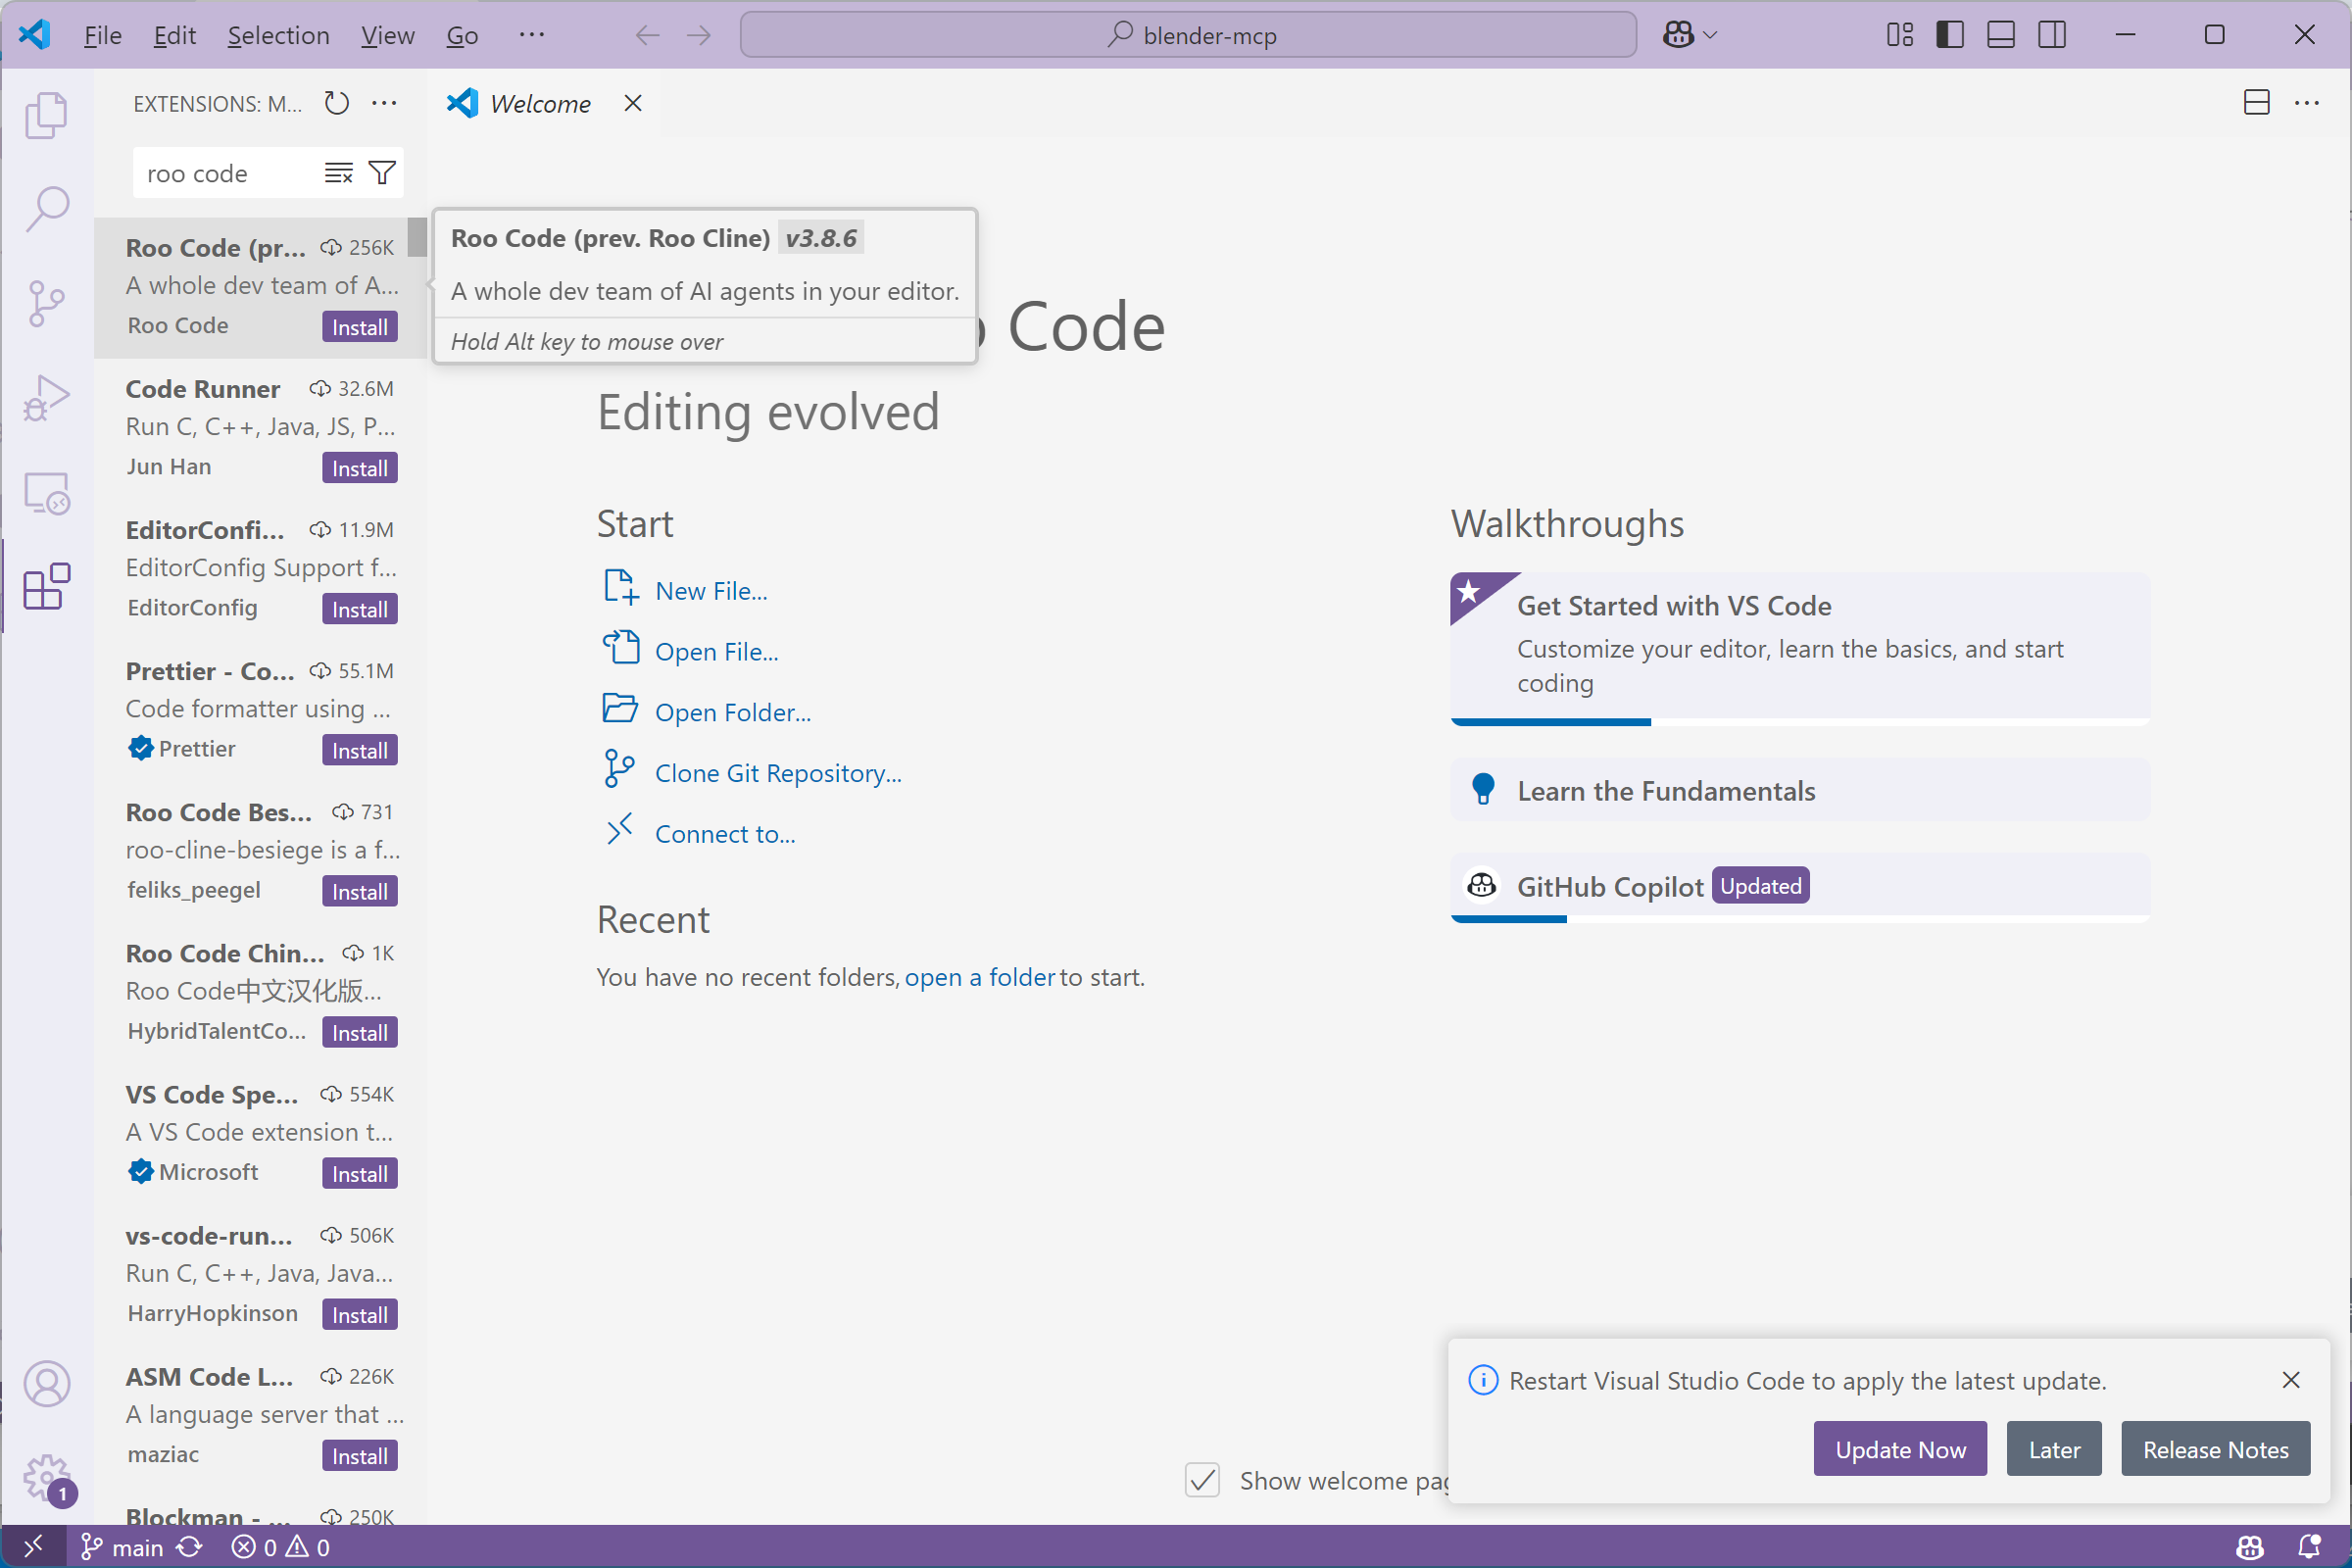
1. Install the Roo Cline extension in VSCode
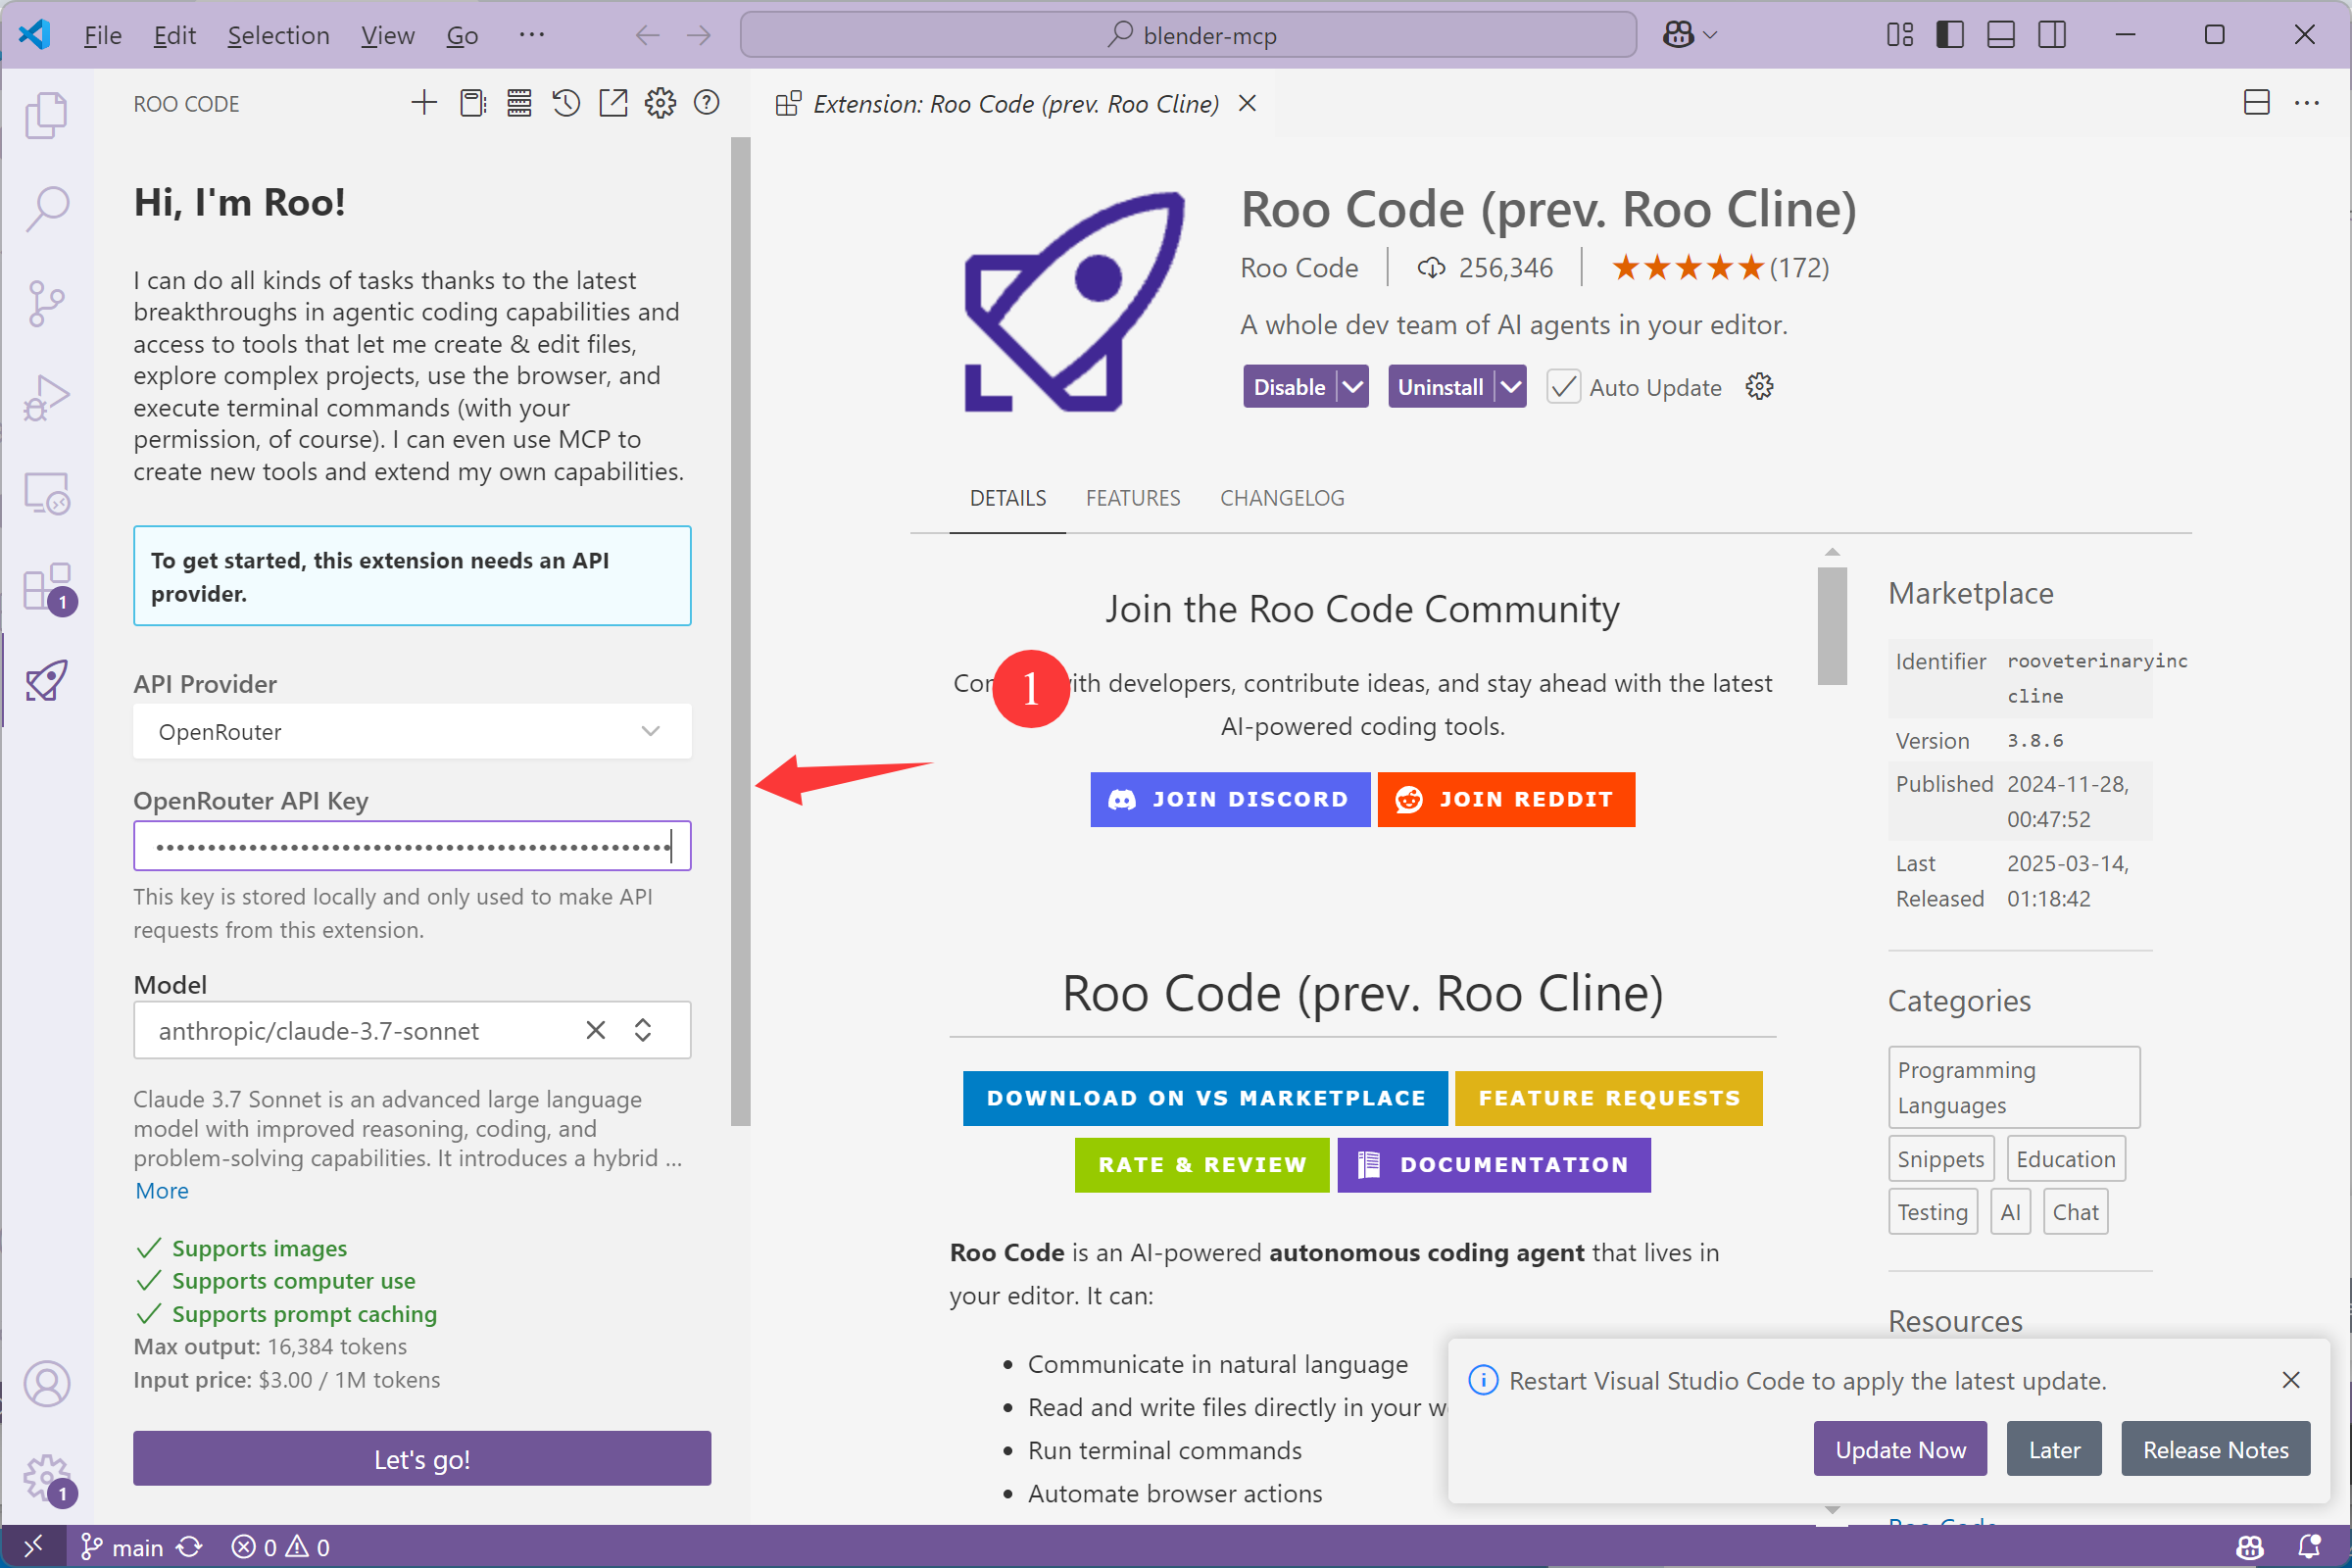
2. Set your API key
3. Configure the MCP server with the command uvx blender-mcp
⚠️ Important: Only run one MCP server instance (in Cursor, Windsurf, VSCode, or Claude Desktop), not multiple instances simultaneously
If you have previously installed Blender MCP, you need to uninstall it first:
addon.py file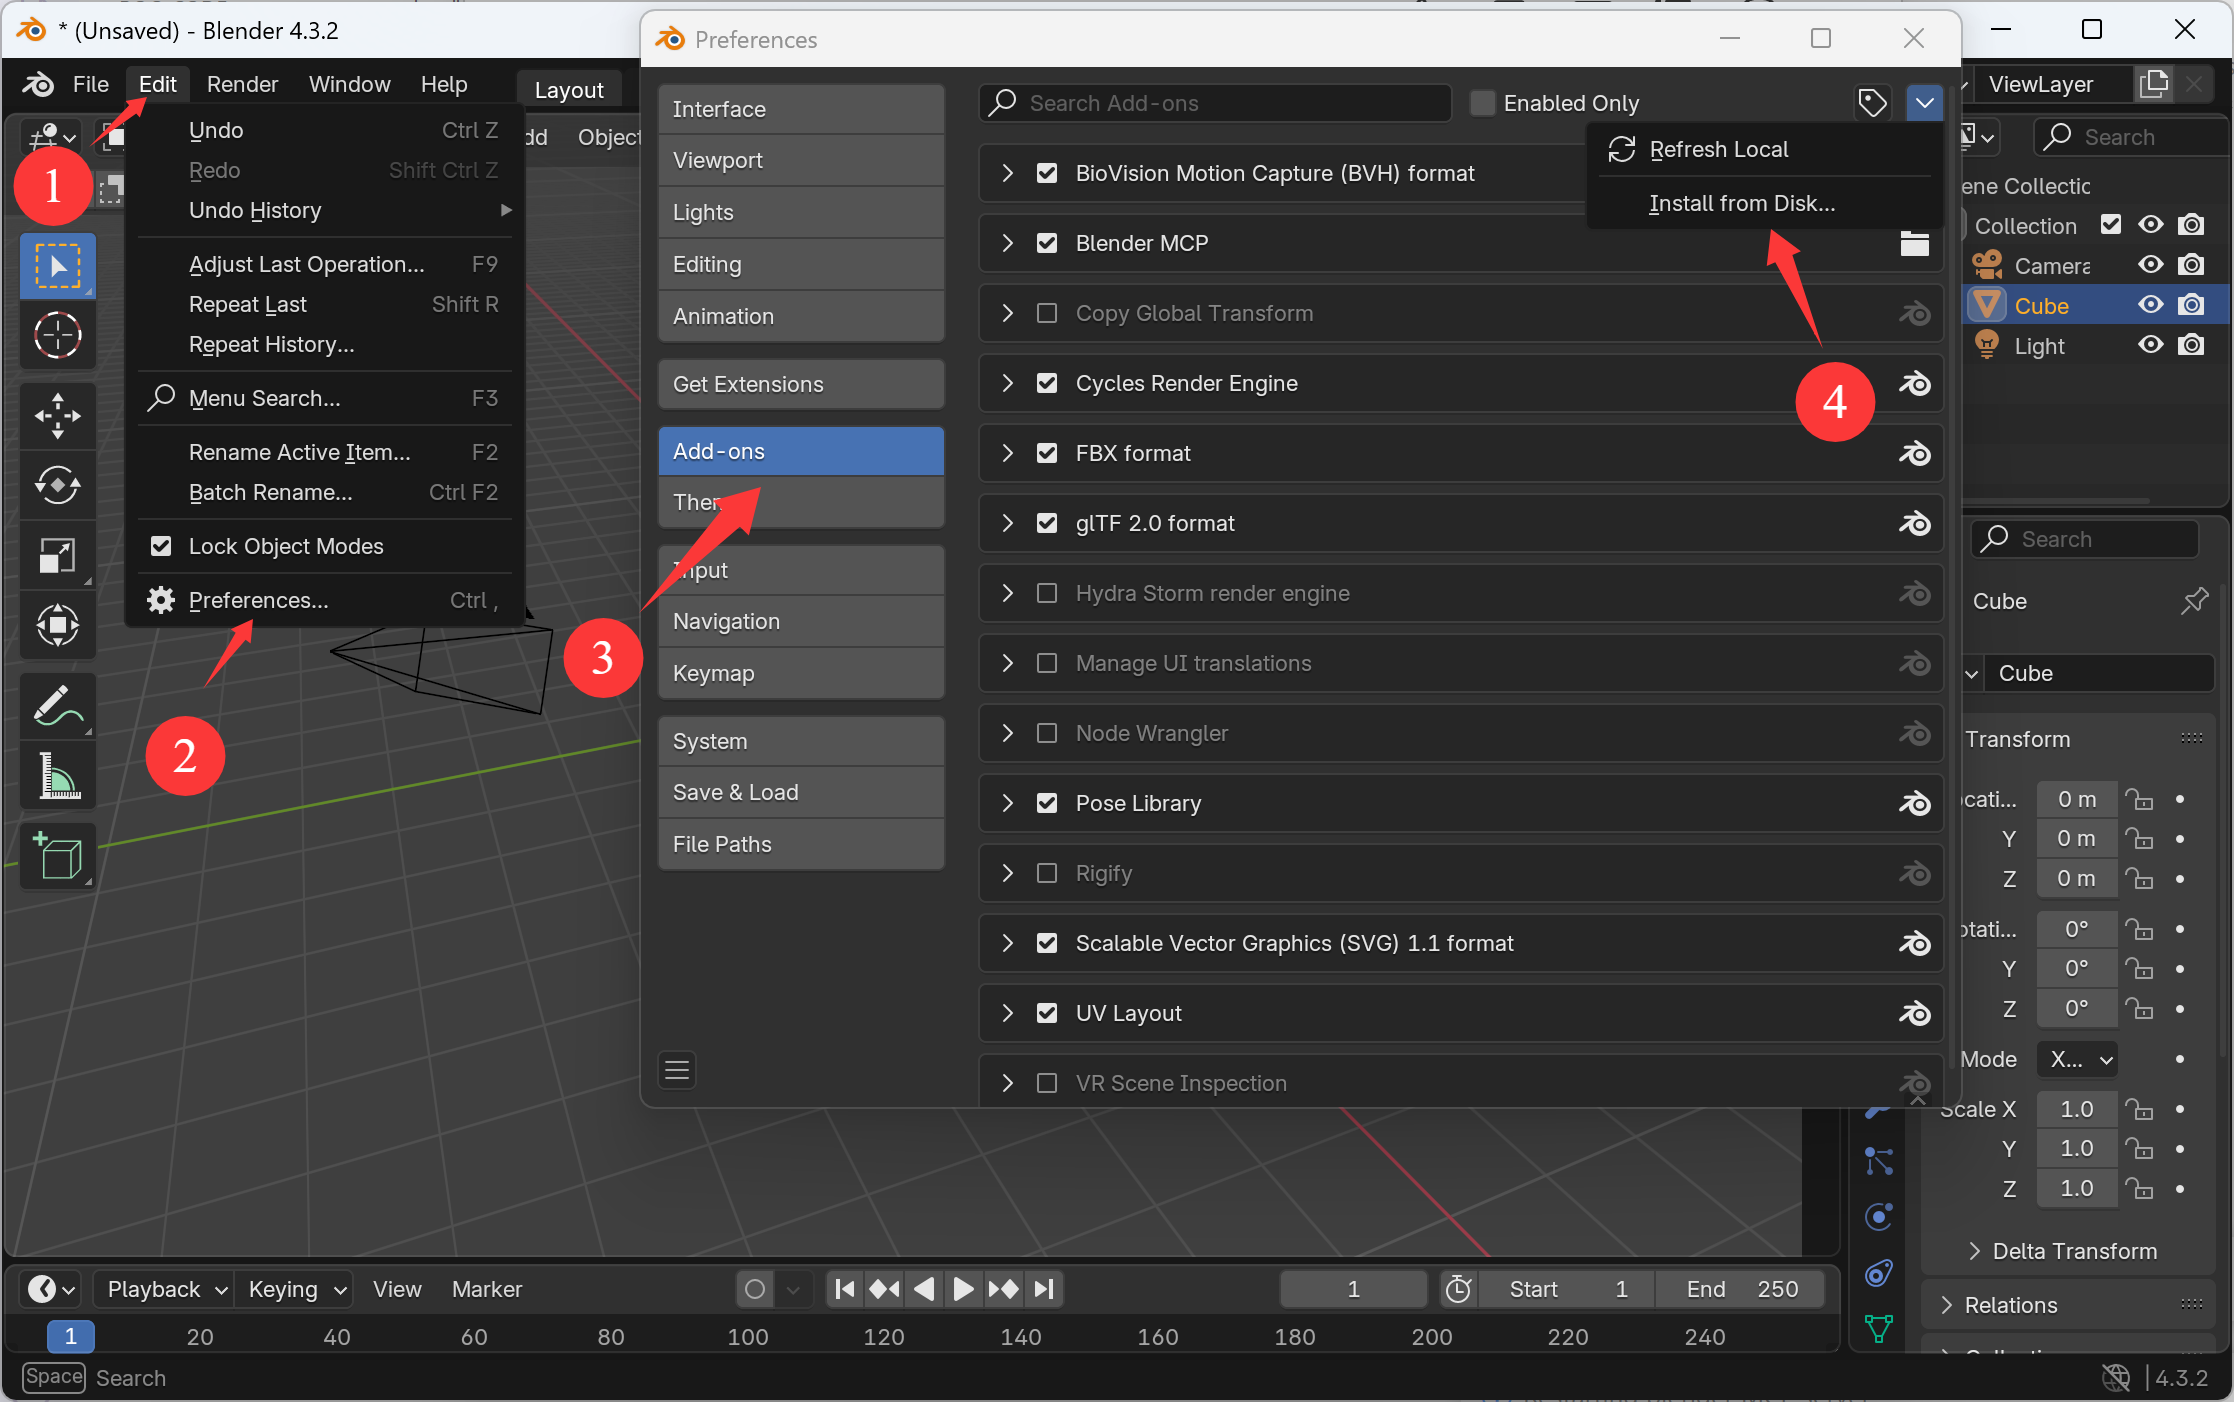
Installing the Blender MCP addon
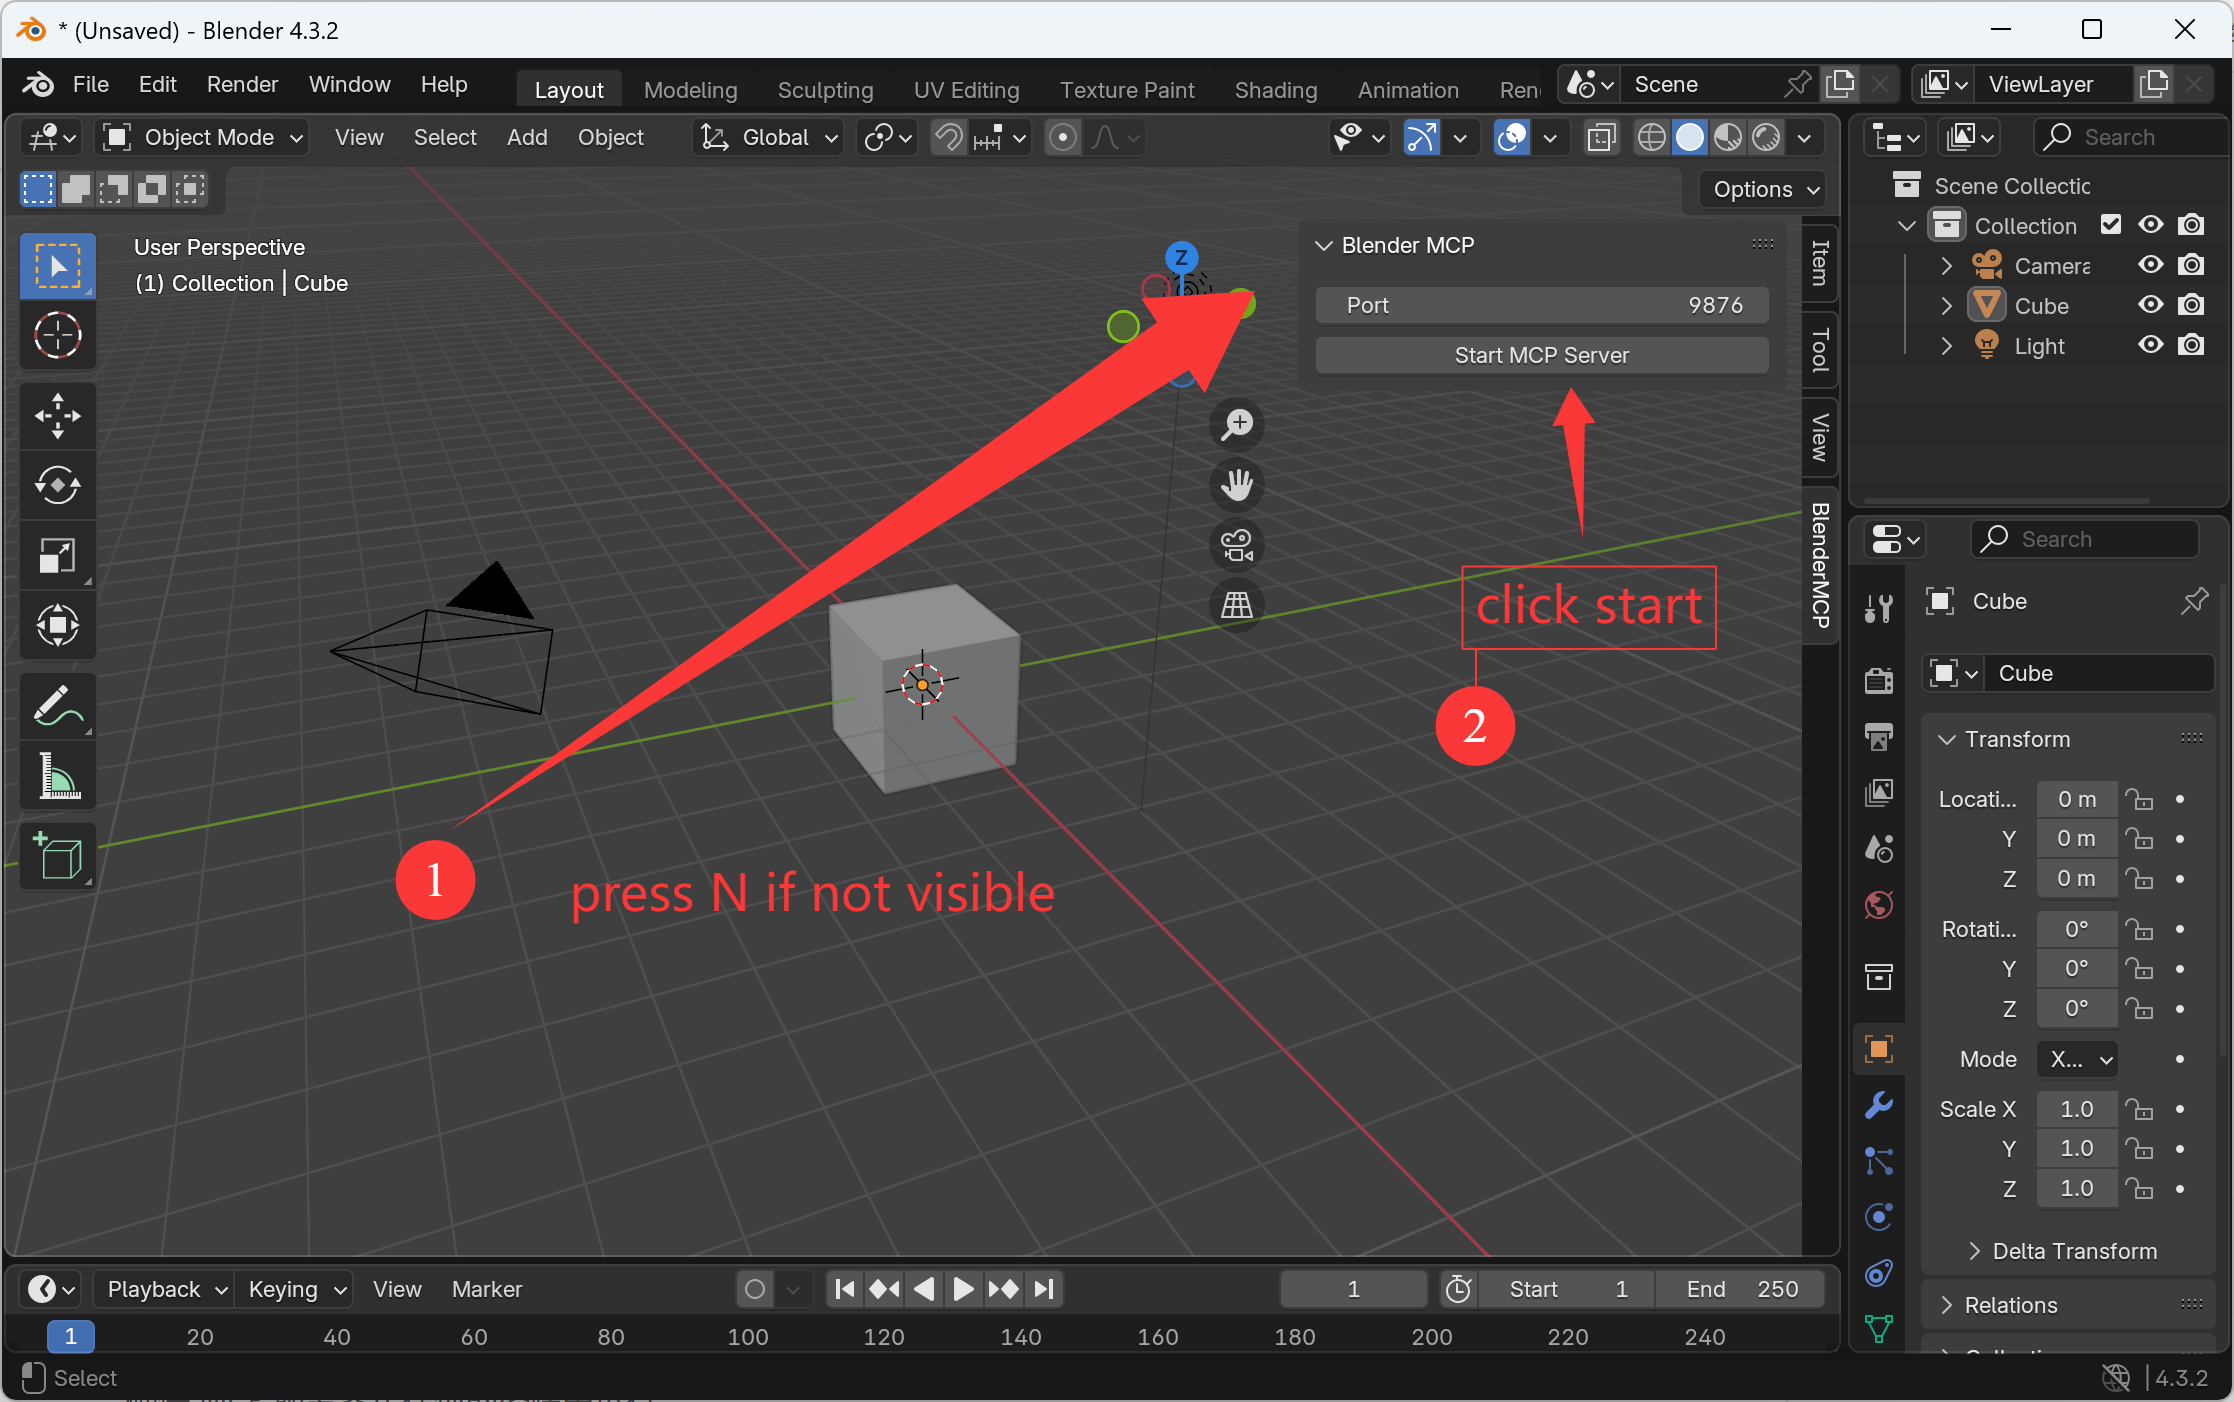
Configuring the Blender MCP addon
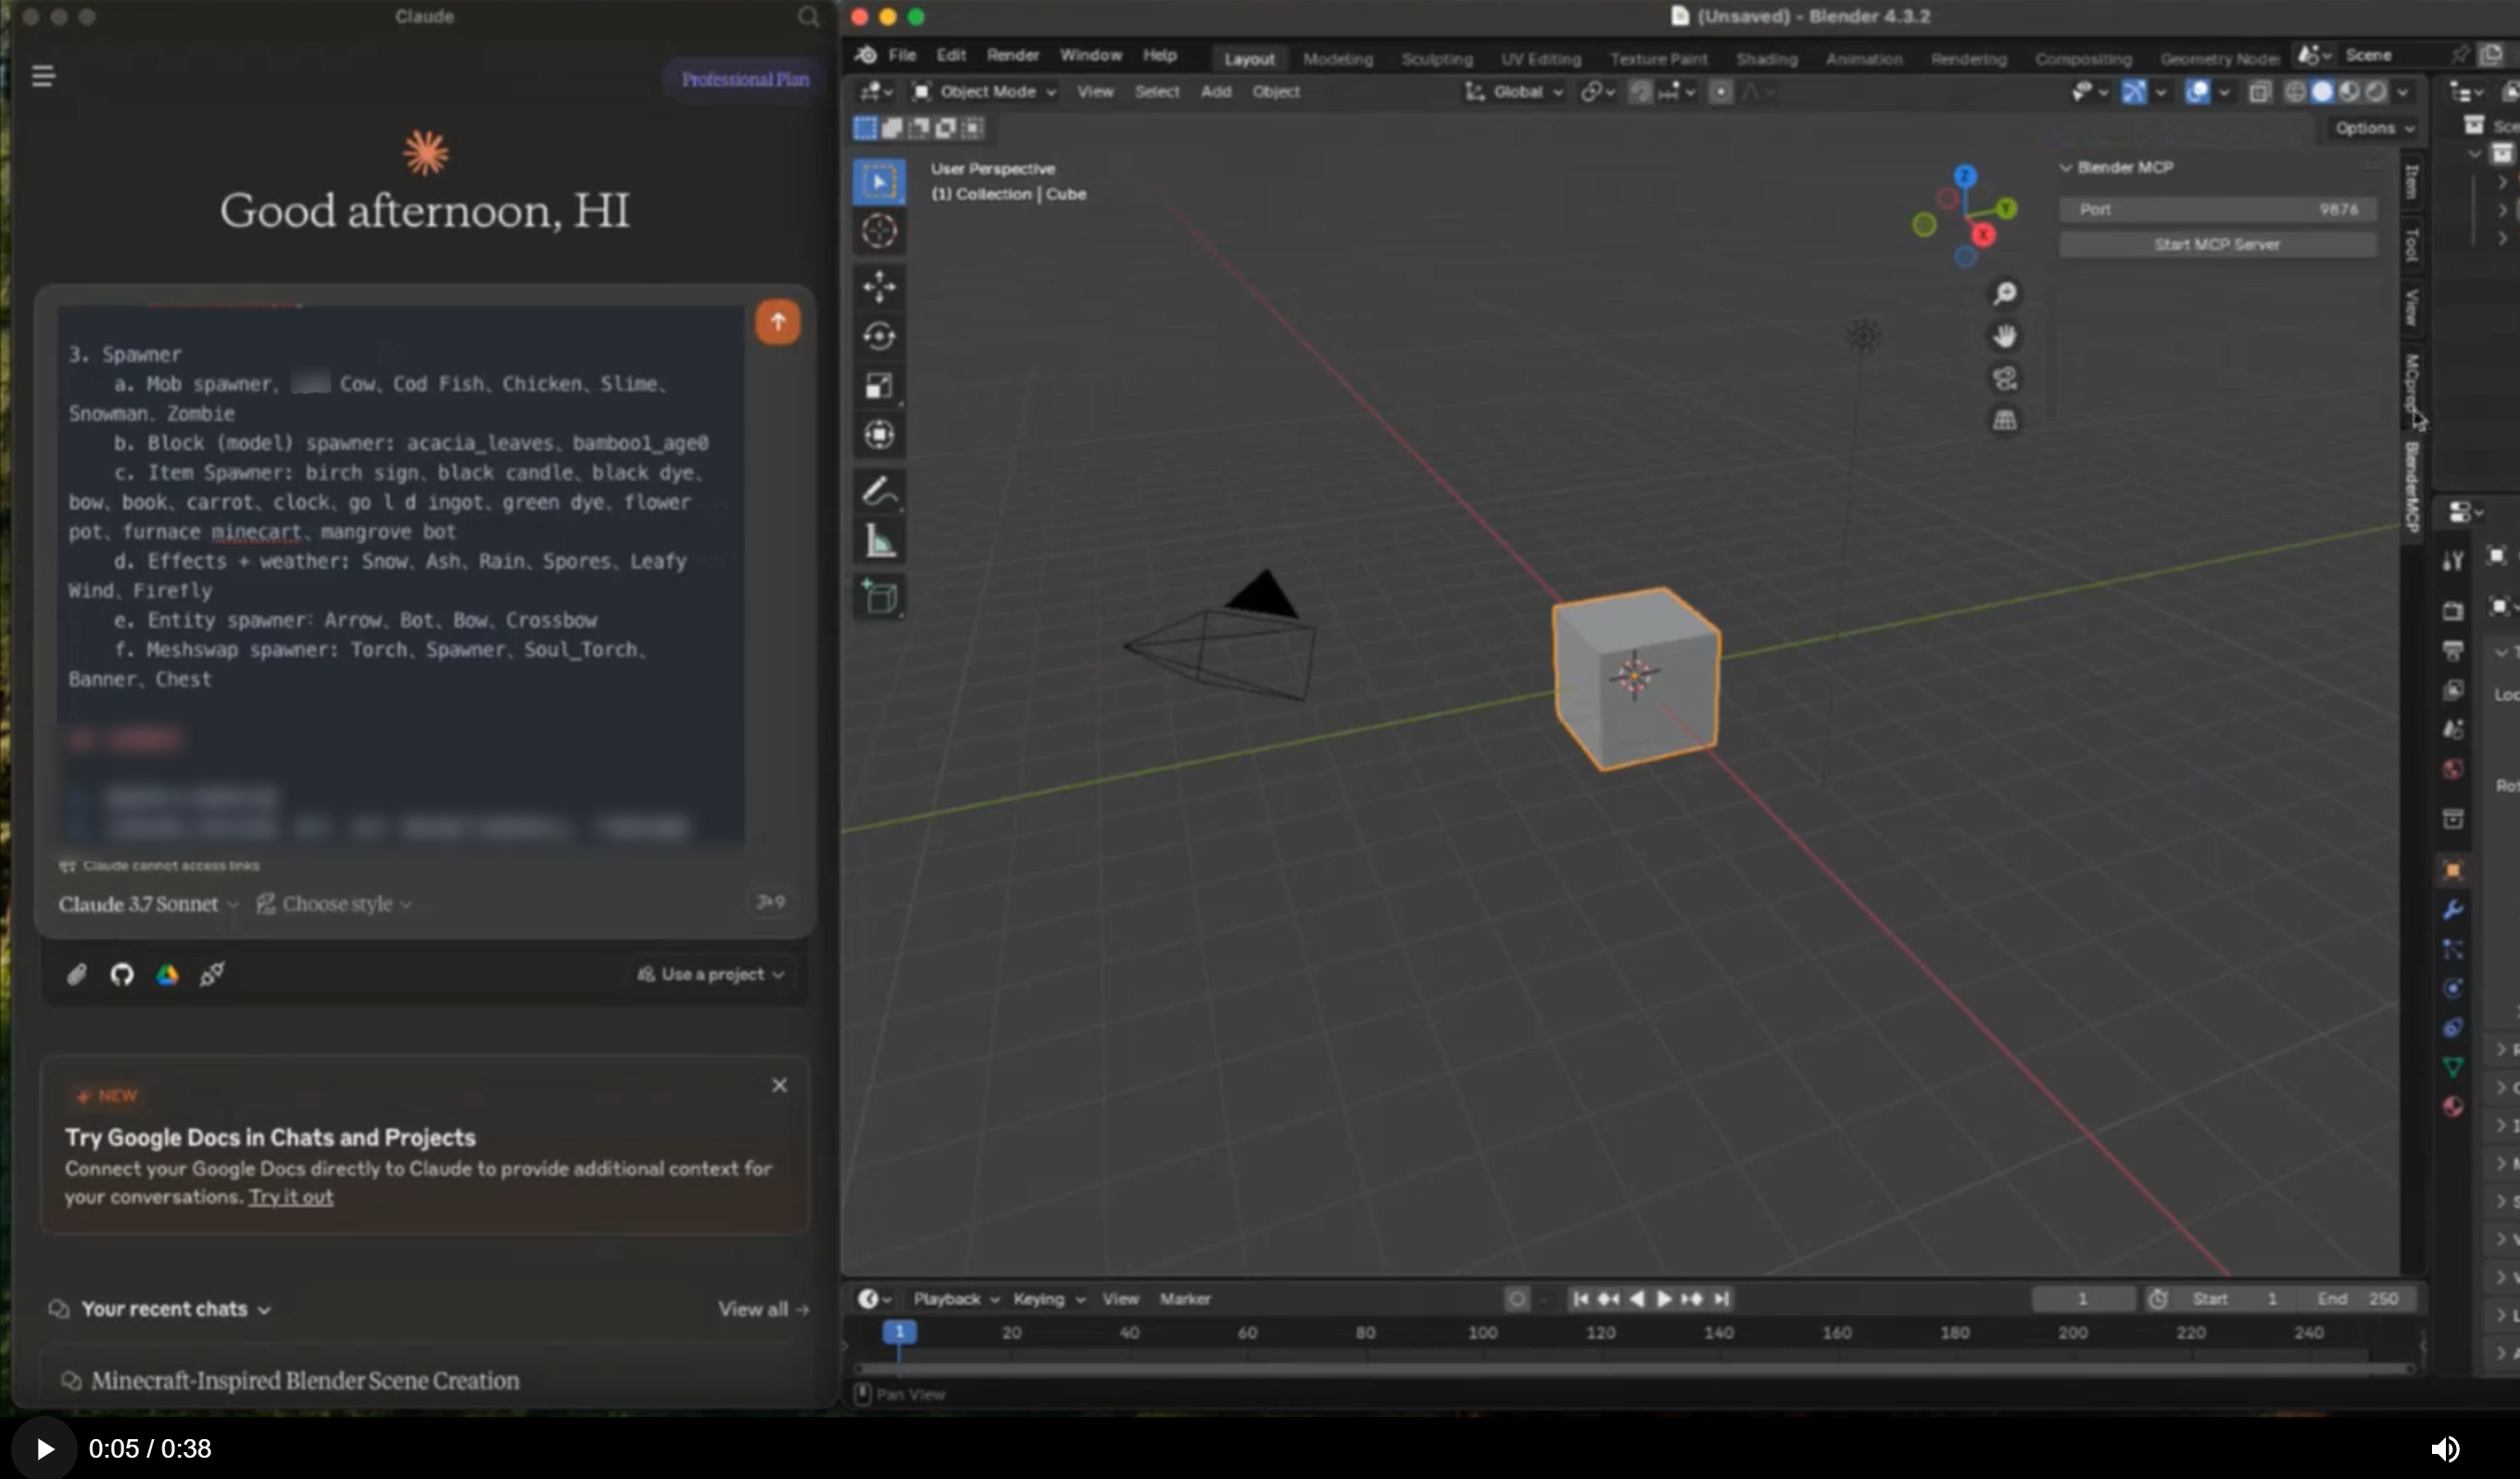
Once the config file is set up in Claude and the plugin is running in Blender, you'll see a hammer icon with Blender MCP tools.
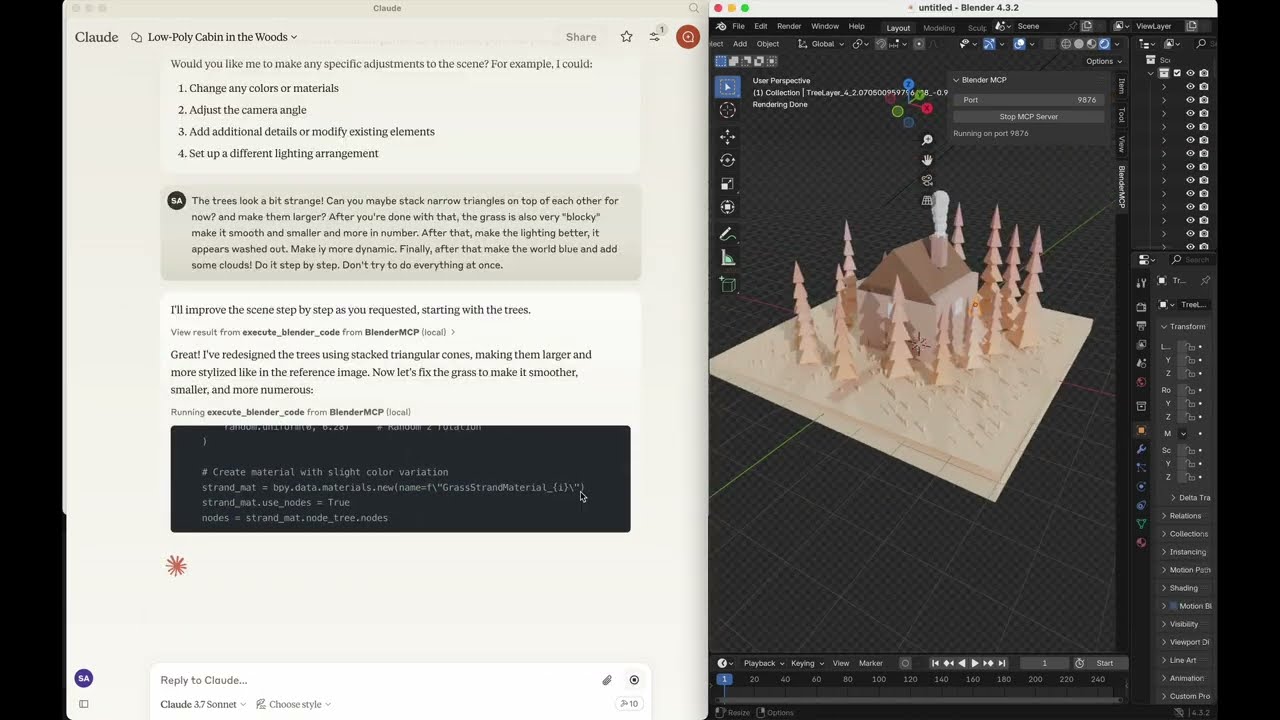
In this demonstration, you'll see how Blender MCP allows you to provide a 2D reference image and have Claude AI generate a 3D model in Blender — all through natural language conversation.

Rapidly prototype 3D concepts from sketches or descriptions, accelerating the conceptualization process.
Learn more
Create game assets quickly with natural language descriptions, streamlining the development pipeline.
Learn more
Teach 3D modeling concepts with an accessible interface that lowers the technical barrier for students.
Learn more
Generate 3D architectural elements and environments from textual descriptions or reference images.
Learn more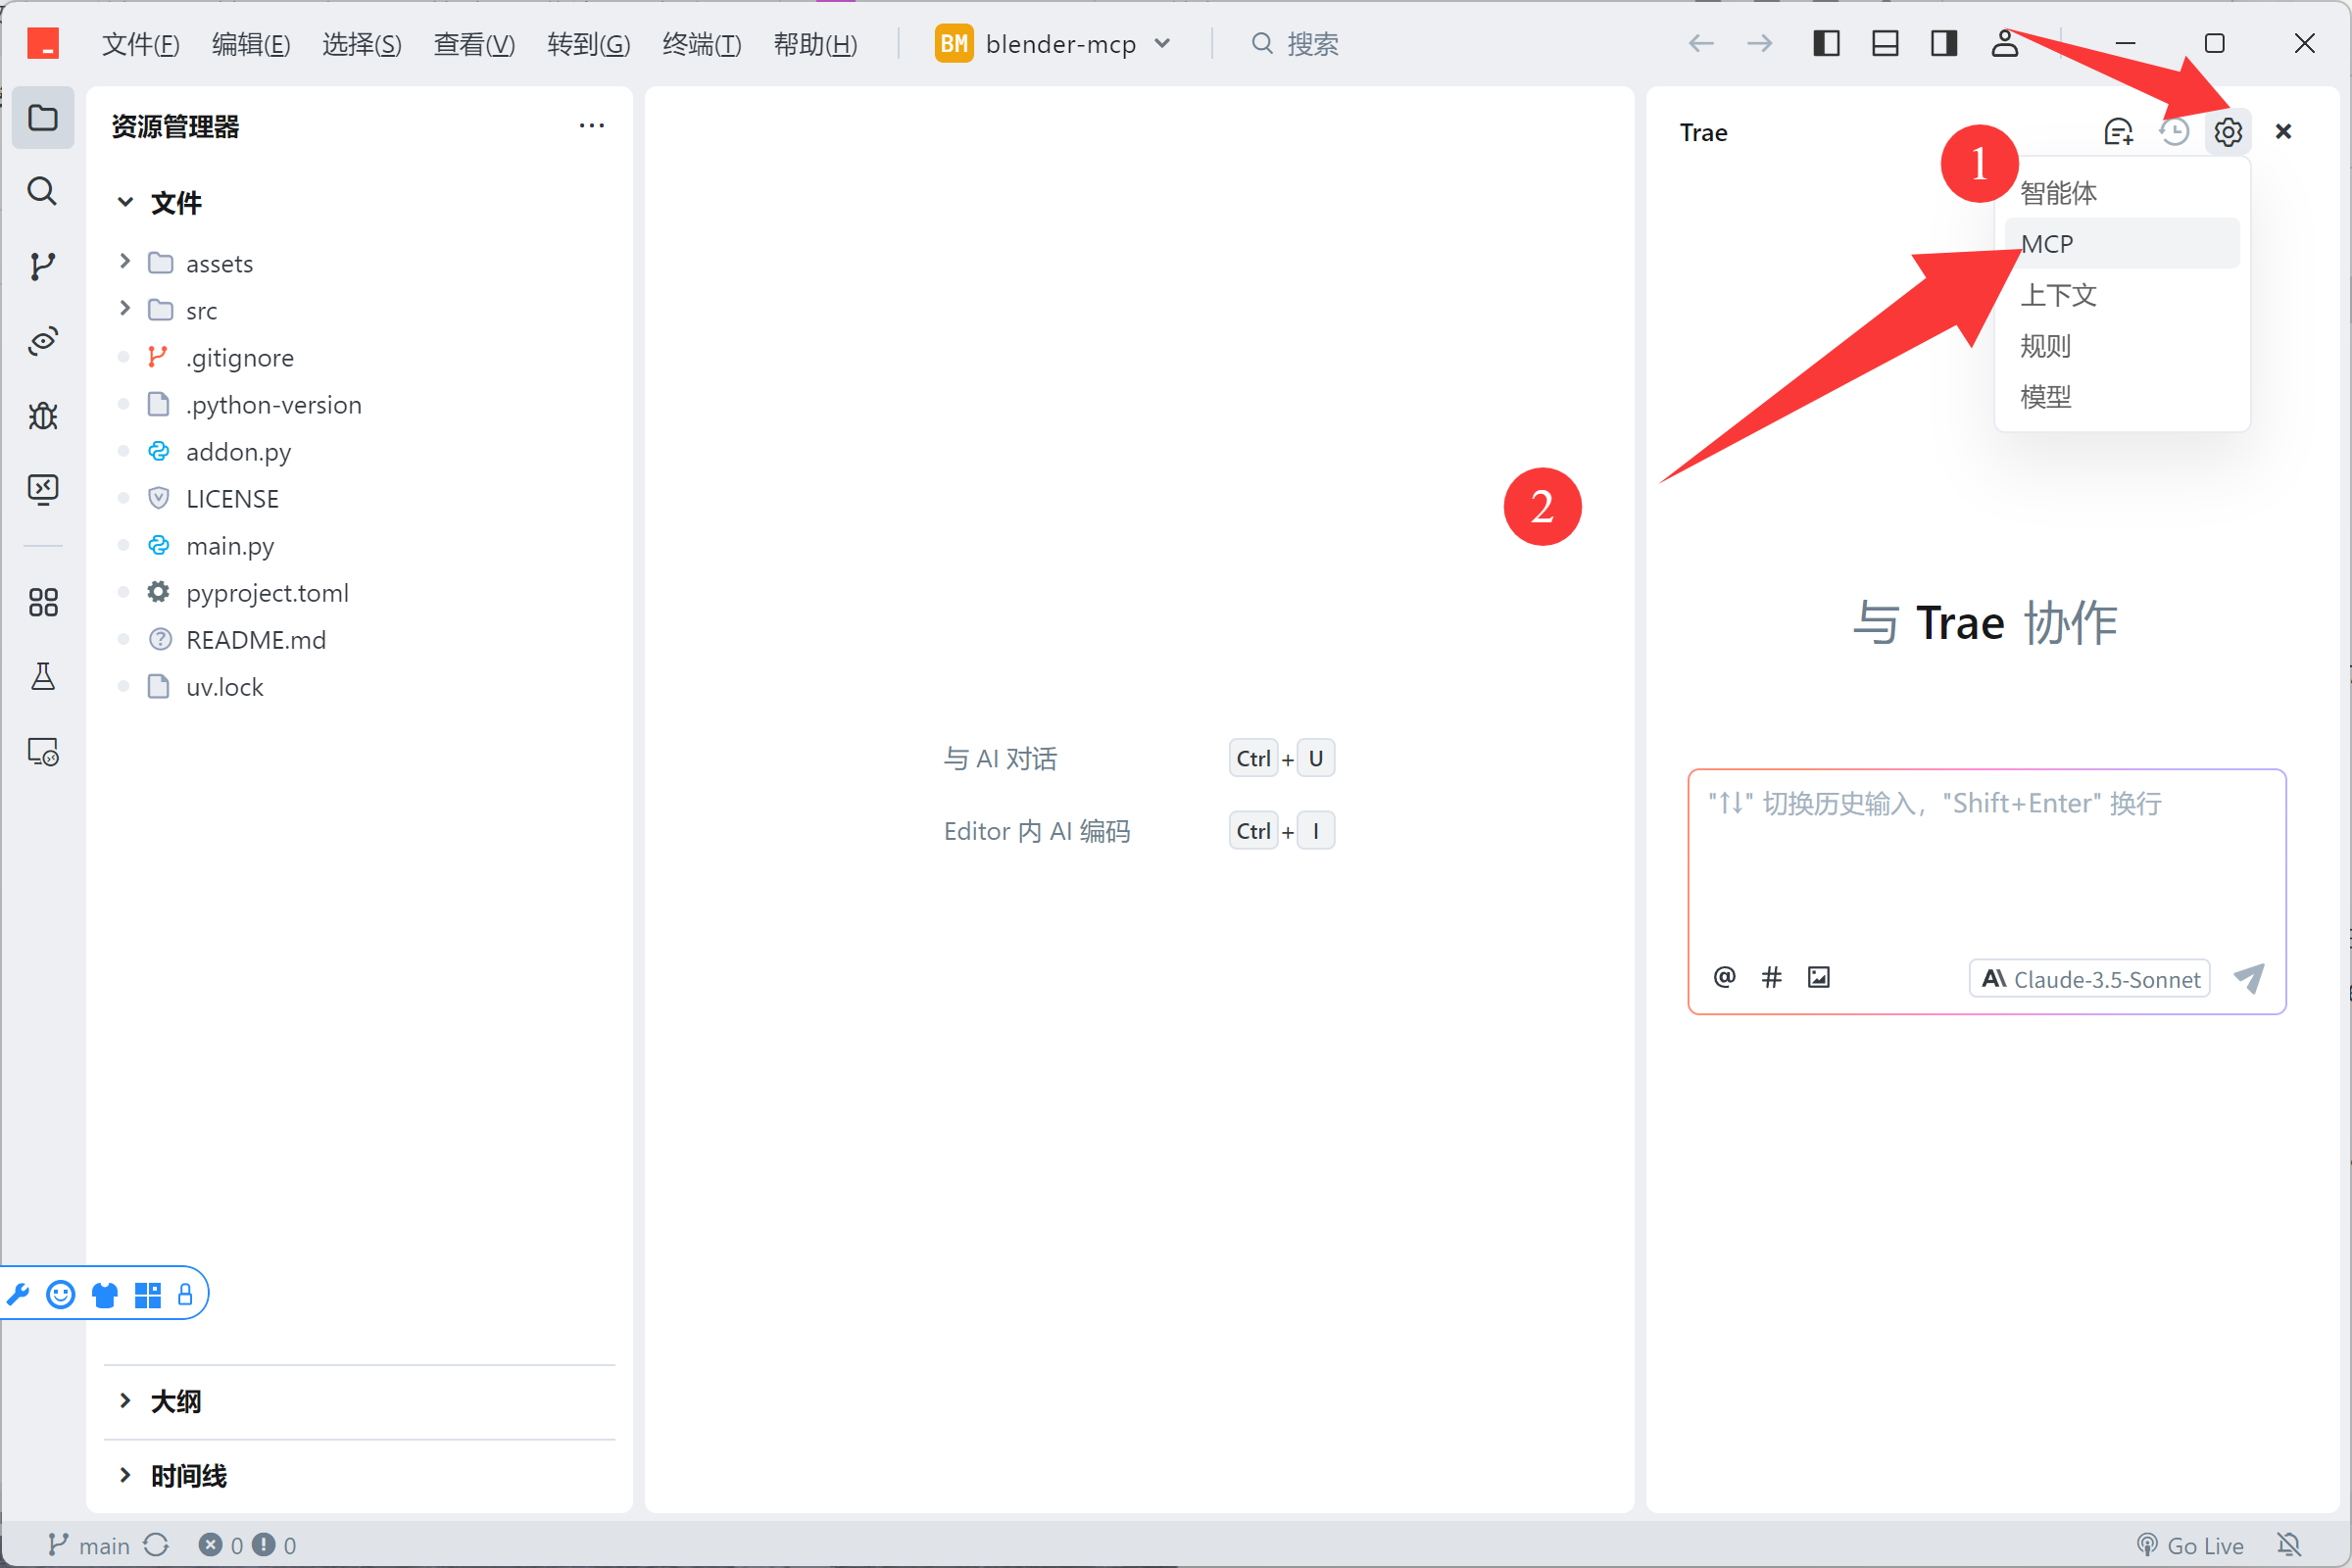
Enhance your 3D workflow by integrating Blender MCP with Trae Editor for powerful AI-assisted coding and modeling capabilities.
Learn more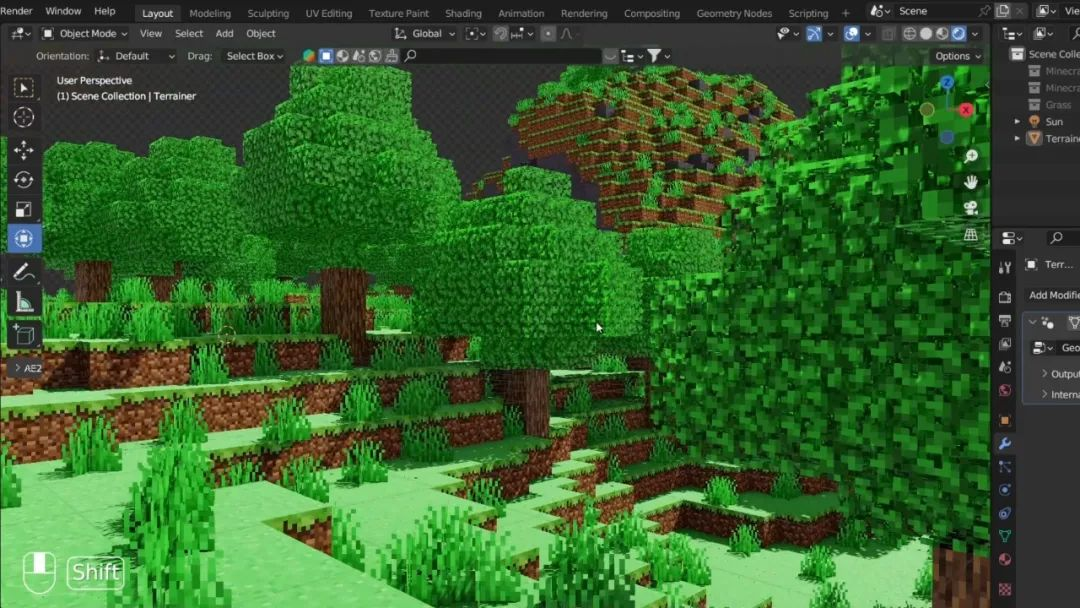
Create stunning Minecraft-style 3D scenes in just 10 minutes using natural language prompts, even with no prior Blender experience.
Explore our collection of tutorials, guides, and articles to help you master Blender MCP
Master viewport navigation, object control, and view switching — make Blender obey your commands with traditional workflows and MCP.
Read Article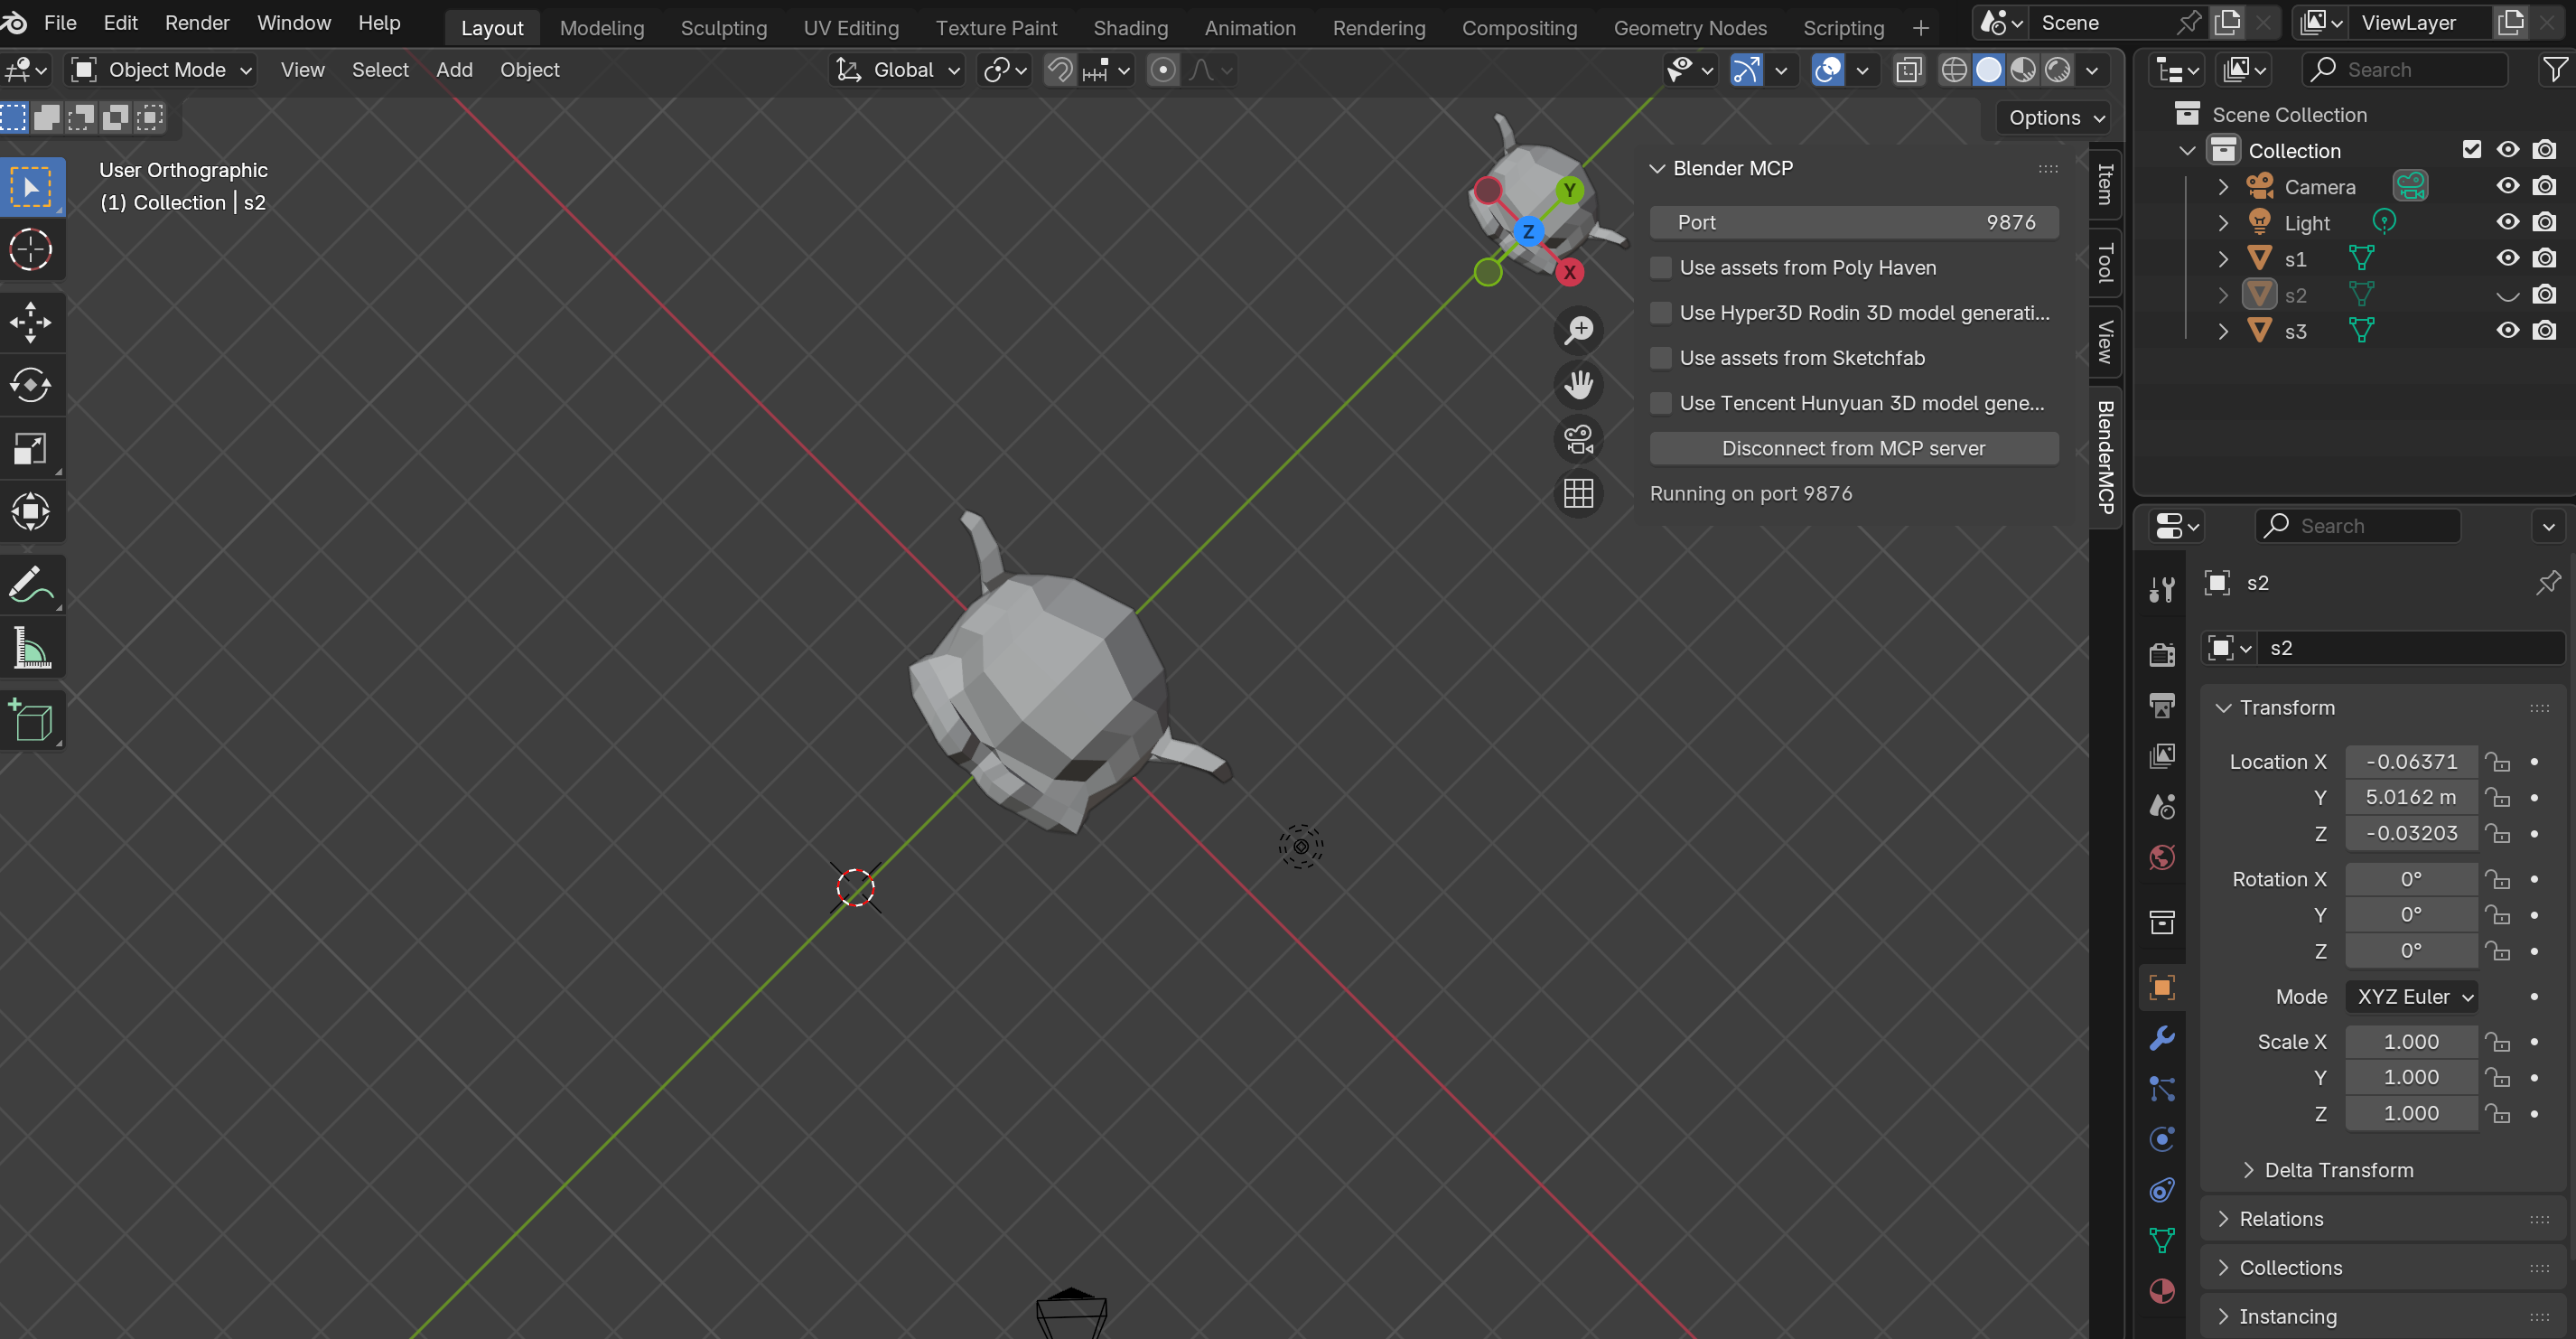
Master the 3D Cursor, Origin points, and coordinate systems — the invisible logic that makes Blender behave predictably.
Read Article
A complete 3D modeling workflow from primitives to final render — recreate Vermeer's masterpiece using basic shapes and smart techniques.
Read Article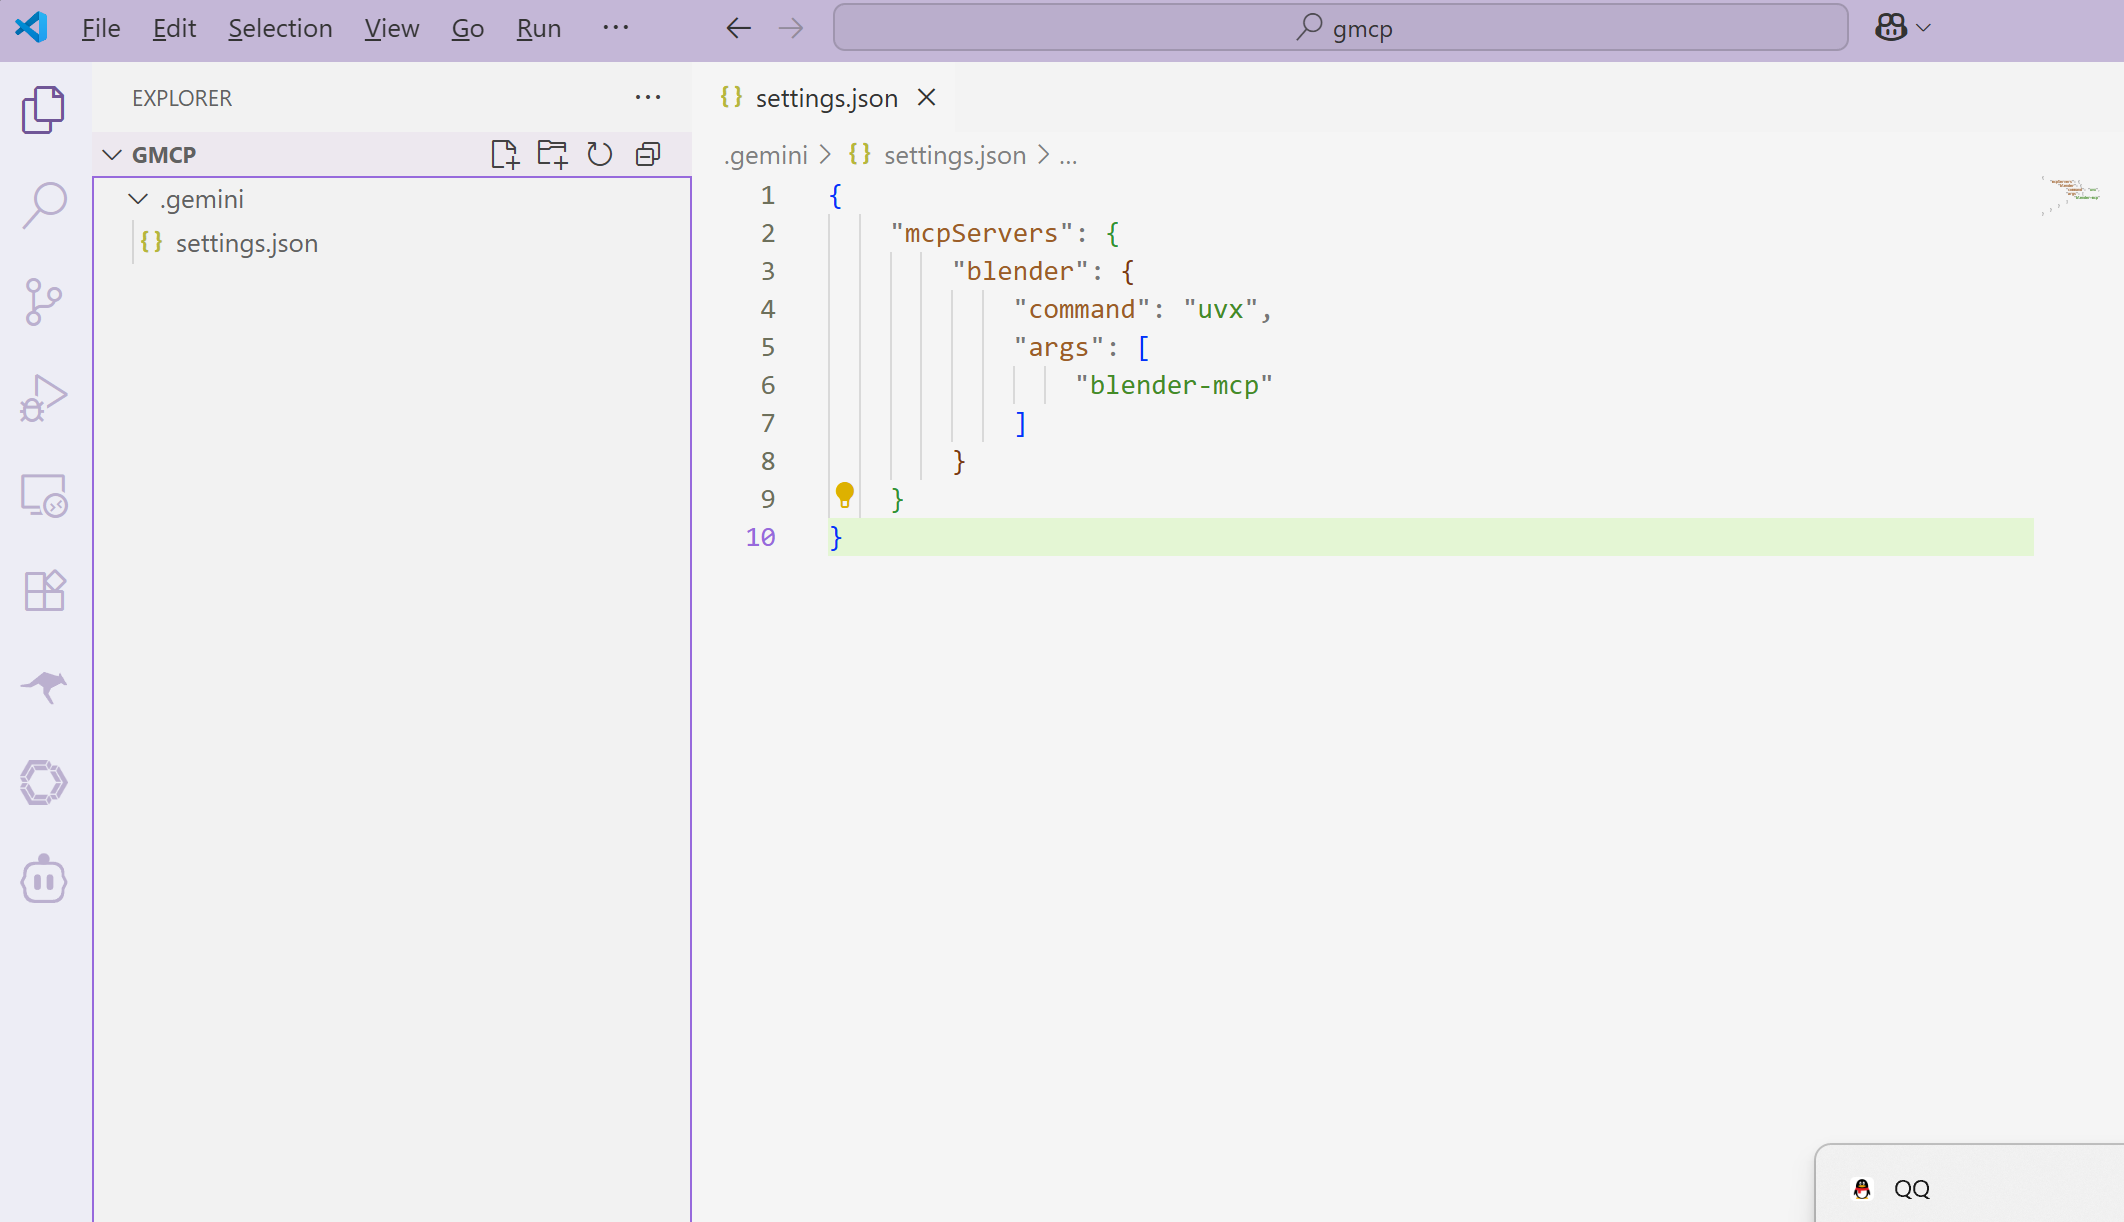
Complete step-by-step guide covering Node.js setup, Gemini CLI installation, and MCP service configuration.
Read Article
Learn how to create stunning Minecraft-style 3D scenes using natural language prompts with Blender MCP.
Read ArticleDownload the Blender MCP plugin from GitHub and install it in your Blender application.
Download PluginSet up the MCP server to establish communication between Claude AI and Blender.
View Setup GuideUse natural language instructions to create and modify 3D models in Blender through Claude.
See ExamplesBlender MCP not only supports Claude but also other large language models like DeepSeek R1. Through OpenRouter.ai, you can easily switch between different models for 3D modeling.
Visit OpenRouter.ai and create an account.
Generate an API key in your OpenRouter account, which you'll need to configure different models.
Follow these steps to configure DeepSeek R1 and Claude Sonnet 4.5 models in VSCode:
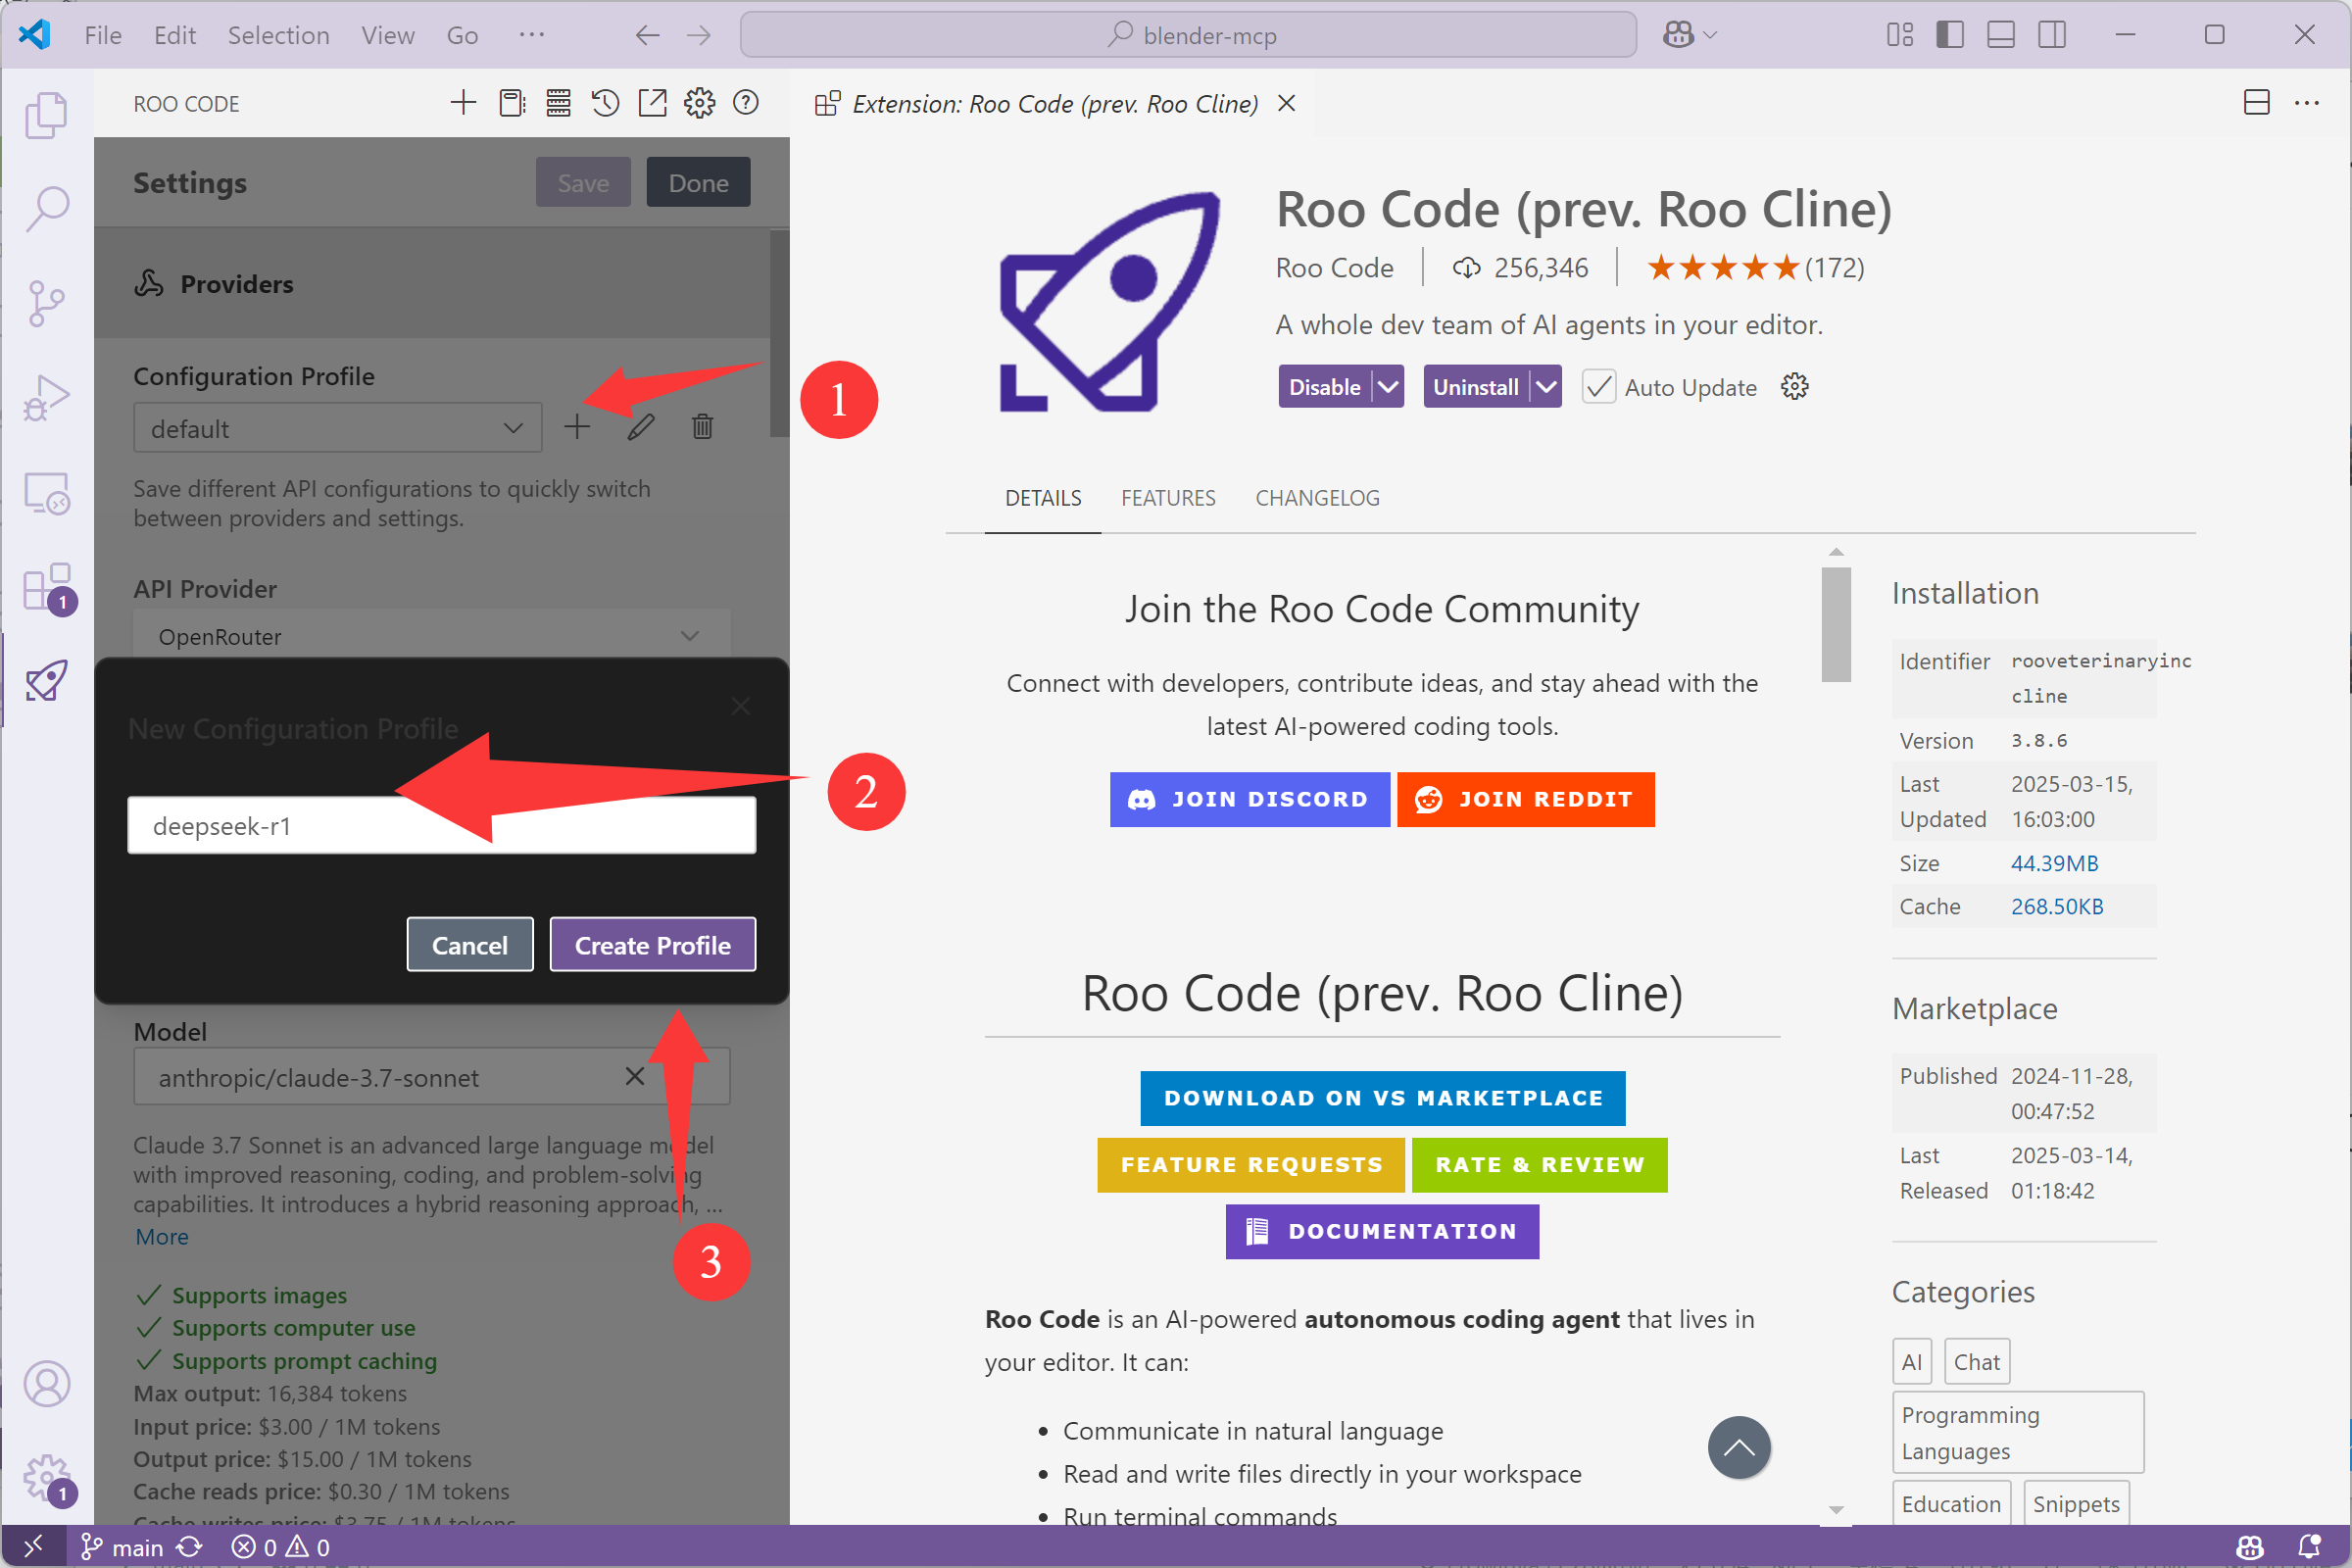
Create DeepSeek Profile
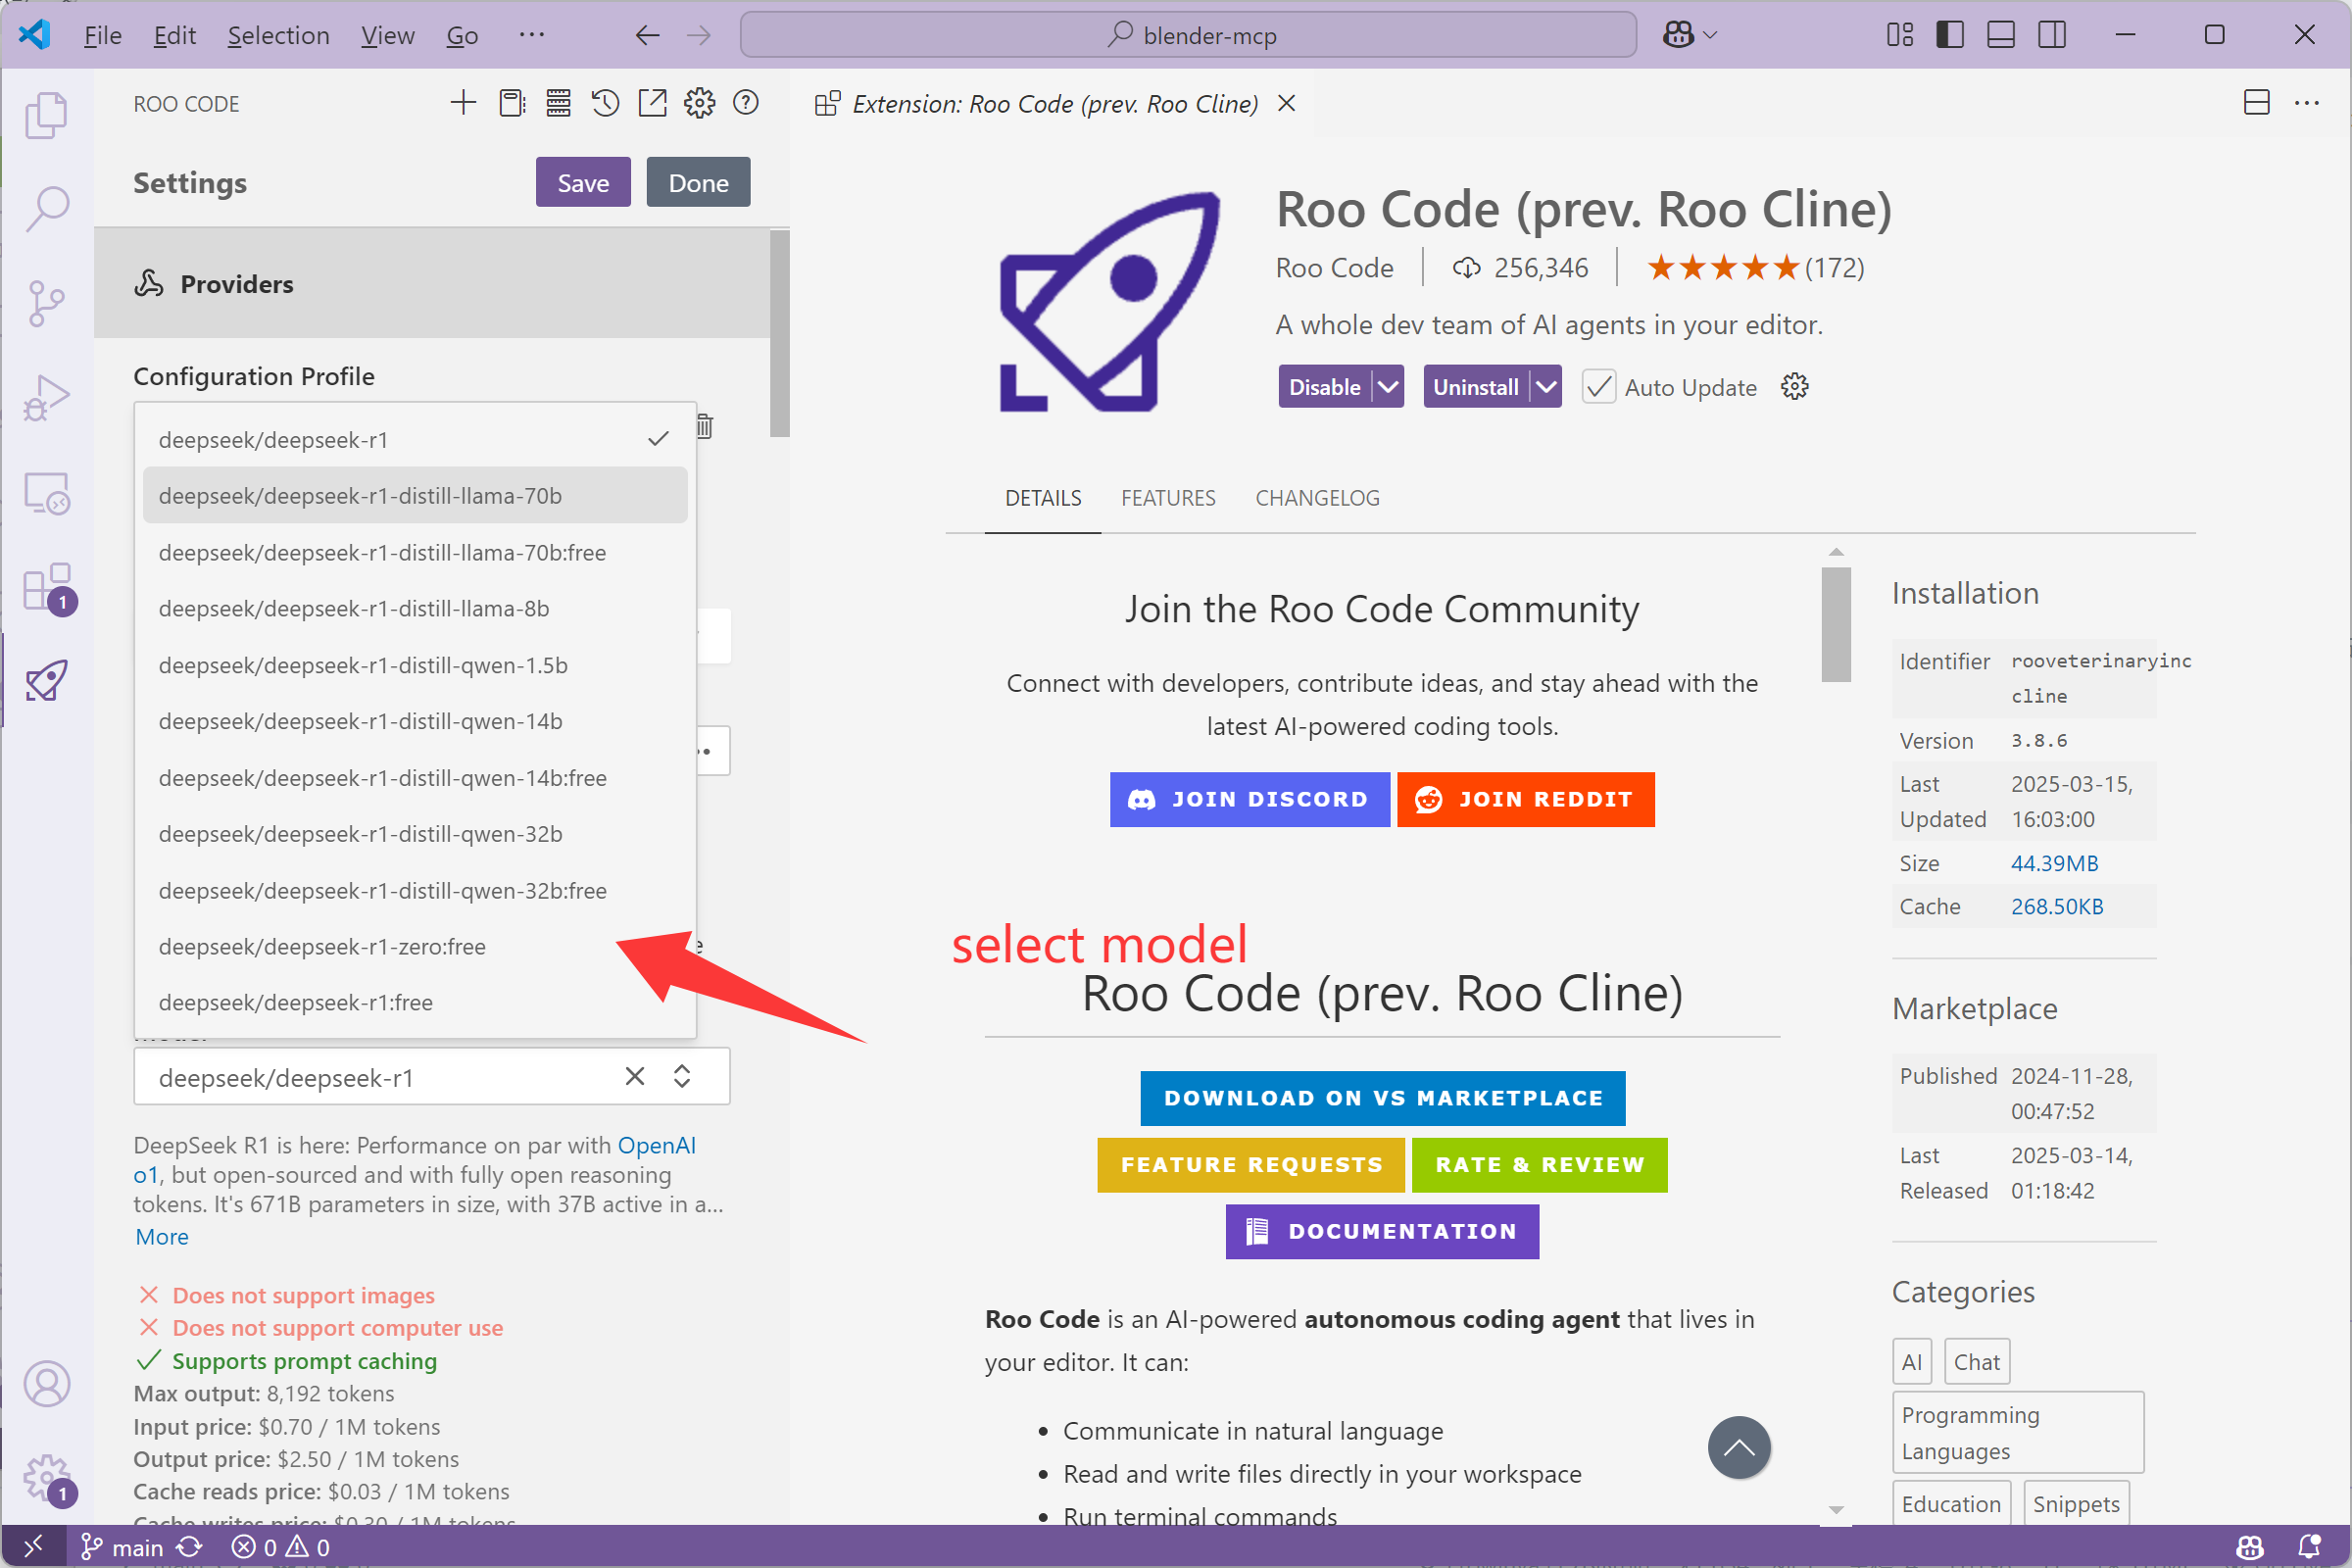
Configure DeepSeek Model Parameters
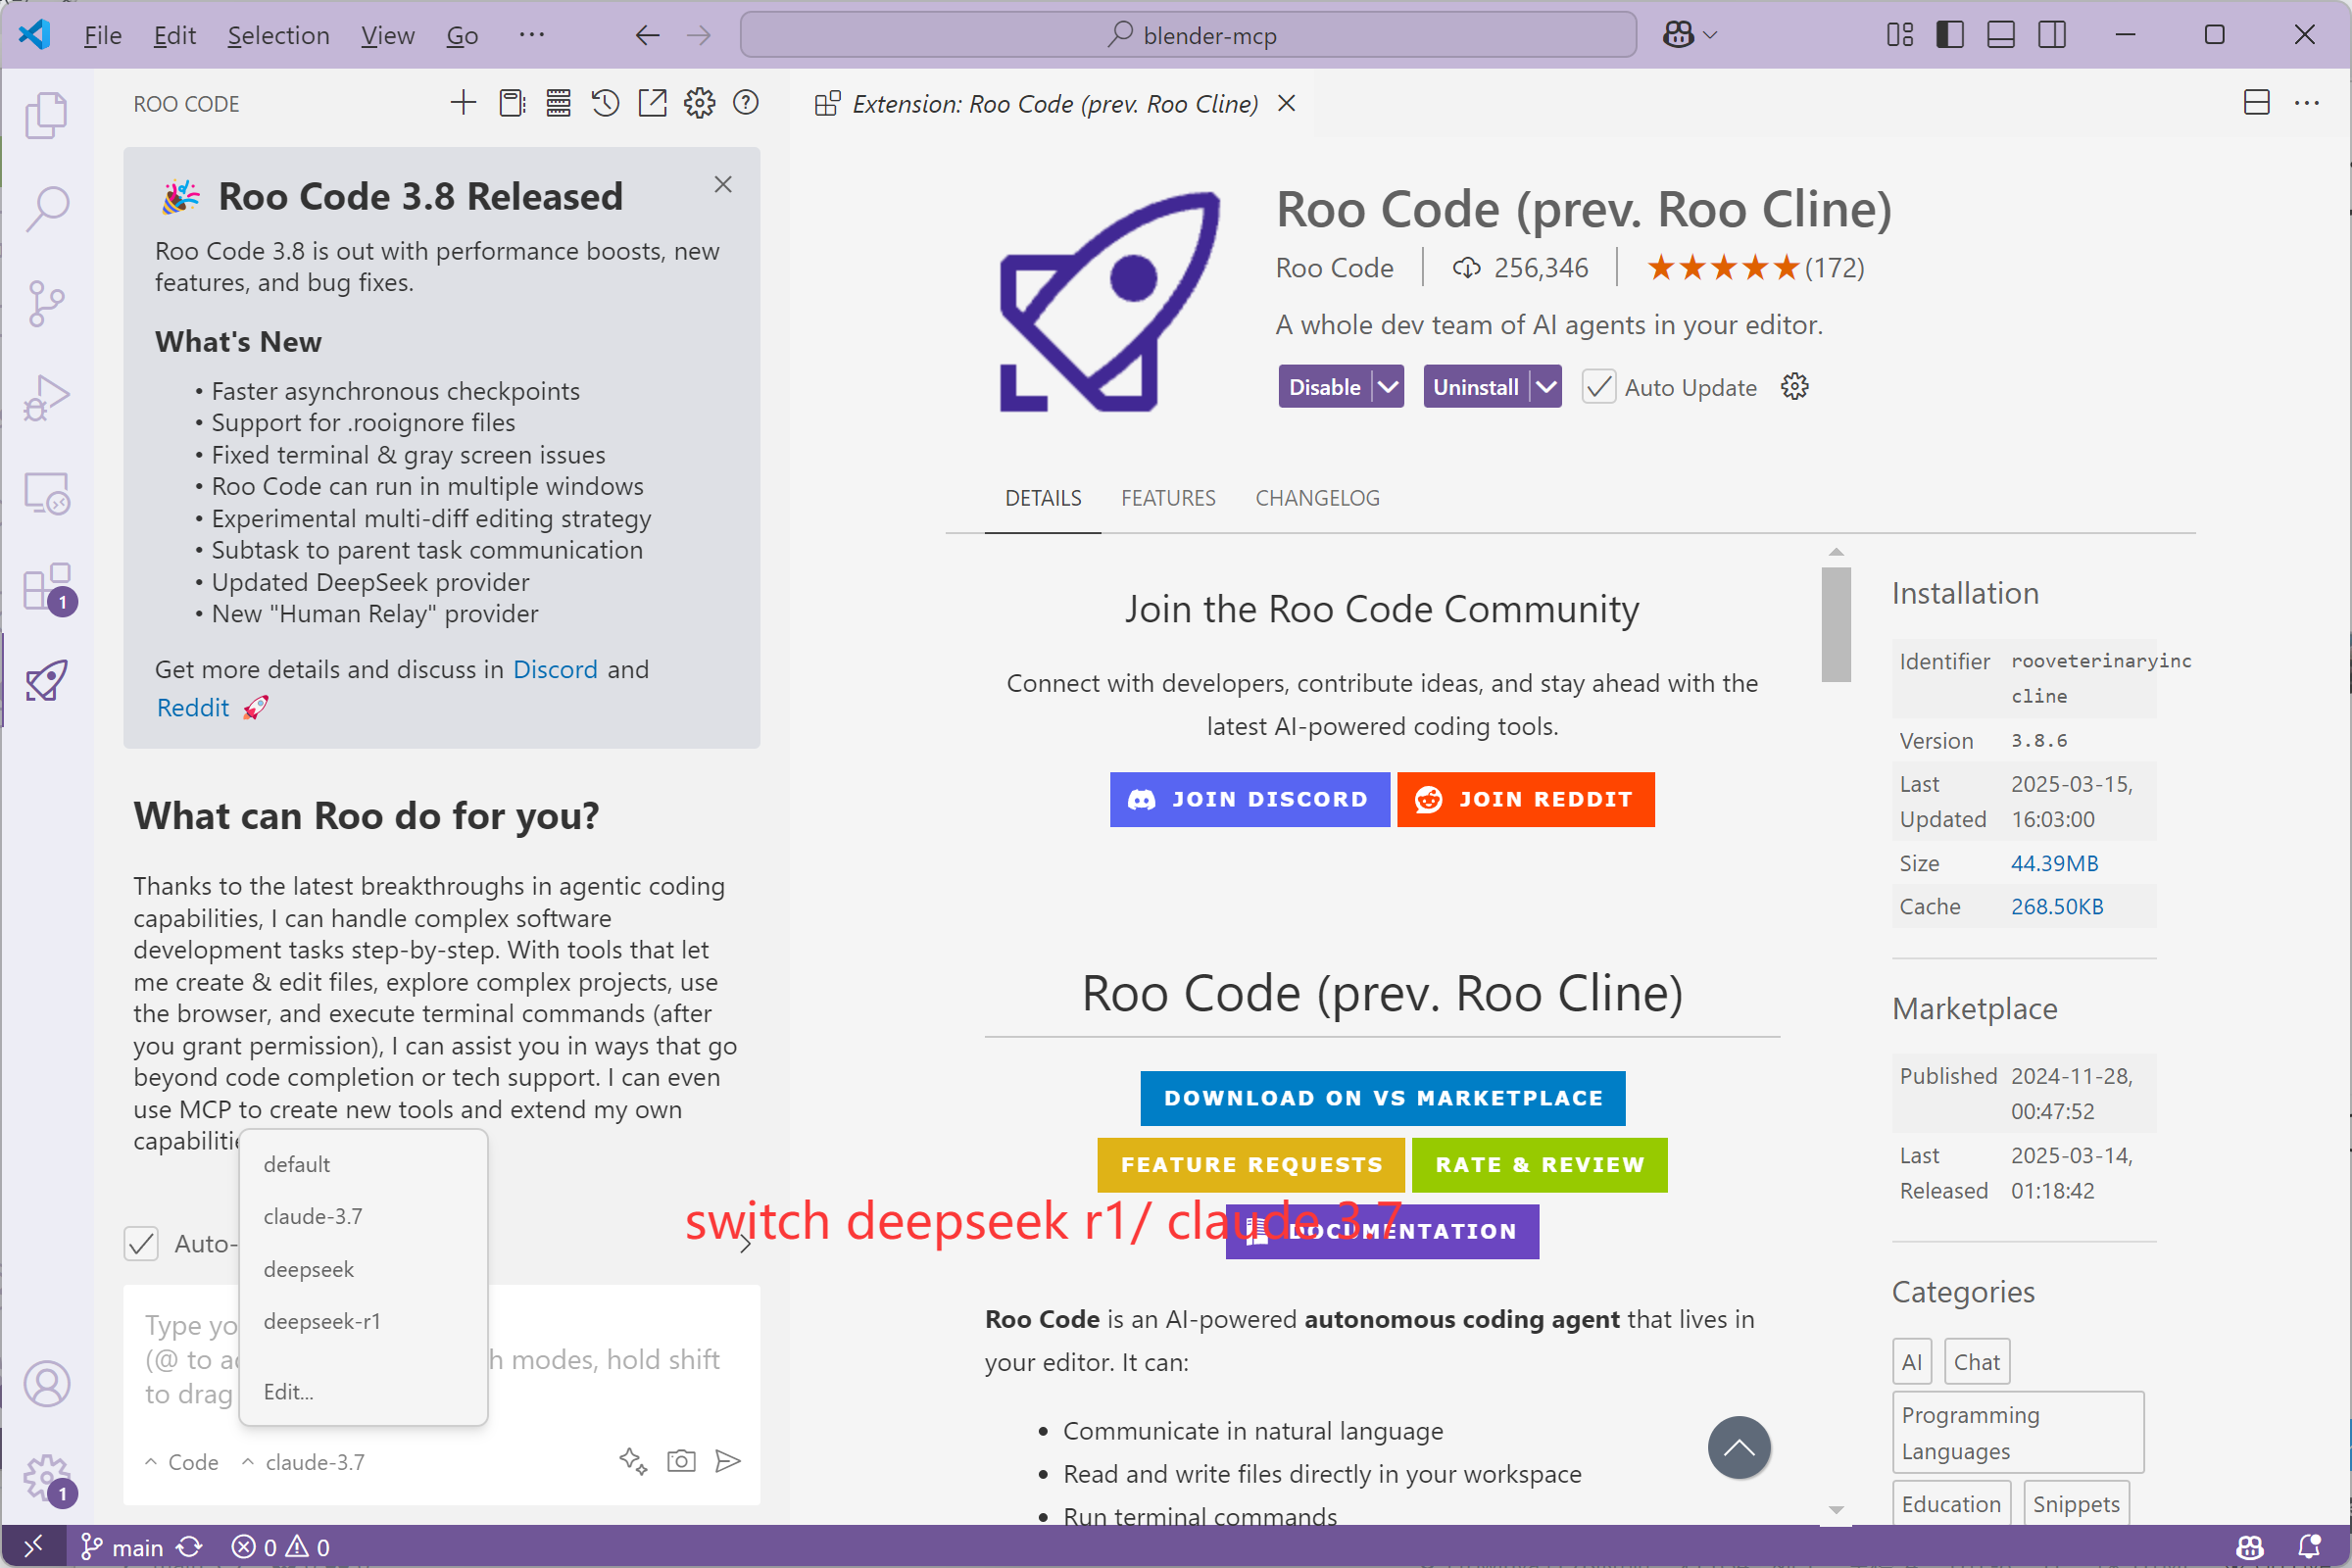
Switch Between DeepSeek R1 and Claude Sonnet 4.5
deepseek-ai/deepseek-coder-v2anthropic/claude-3-7-sonnetuvx blender-mcp| Feature | DeepSeek R1 | Claude Sonnet 4.5 |
|---|---|---|
| Strengths | Code generation, technical understanding | Creative design, natural language understanding |
| Response Speed | Faster | Moderate |
| 3D Modeling Capability | Good geometric understanding | Excellent creative expression |
Enhance your 3D modeling workflow by combining Blender MCP with other MCP tools like server-sequential-thinking. This powerful combination allows for complex modeling tasks with step-by-step planning and execution.
Here's an example of how to use server-sequential-thinking with Blender MCP to create a complex high-rise building model:
Prompt: "I want to use Blender to create a high-rise building. Please use server-sequential-thinking tool to help me generate all the operation steps, then use blender-mcp to execute the generation. Remember to monitor each modification, and if there's anything unreasonable, make timely adjustments. Please also add a larger pavilion next to the existing one."| Feature | Blender MCP | Server-Sequential-Thinking |
|---|---|---|
| Primary Function | 3D model execution in Blender | Step-by-step planning and reasoning |
| Strengths | Direct model manipulation | Complex task breakdown |
| Best Used For | Creating and modifying 3D objects | Planning complex modeling workflows |
To use server-sequential-thinking with Blender MCP:
For more information, visit the Sequential Thinking GitHub repository.
Blender MCP is a tool that connects Blender with Claude AI through the Model Context Protocol (MCP). It allows you to create, modify, and enhance 3D models in Blender through natural language instructions. It was developed by Siddharth Ahuja (ahujasid), who maintains the GitHub repository and shares tutorials on his YouTube channel.
Yes, you need access to Claude AI through Anthropic, which requires a subscription. The MCP server connects your Blender instance to your Claude session.
Blender MCP currently supports Blender 3.6 and newer. The plugin may work with older versions, but full functionality is not guaranteed.
Yes, Blender MCP is open-source and available for personal and commercial use. However, you should review Claude AI's terms of service regarding the commercial use of AI-generated content.
The accuracy depends on the clarity of your instructions and the complexity of the model. Simple objects and modifications work very well, while complex models may require iterative refinement through multiple prompts.
Currently, Blender MCP is designed specifically for Blender. However, the MCP protocol could potentially be adapted for other 3D software in the future.
You can seek help by creating an issue on the GitHub repository, joining the community Discord, or checking the documentation for troubleshooting guides.
Absolutely! The project is open-source and welcomes contributions. You can fork the repository, make improvements, and submit pull requests on GitHub.
You can use VSCode to access Claude's API capabilities with Blender MCP. Install the VSCode extension, configure your Claude API key, and connect to the Blender MCP server. This setup allows you to send natural language instructions directly from VSCode to Blender through Claude's powerful language processing.
Blender MCP supports a wide range of large language models beyond Claude, including DeepSeek R1, Gemini 2.0 Flash Thinking, Qwen 32B, and many others. This flexibility allows you to choose the AI model that best suits your specific 3D modeling needs and preferences.
Yes! You can use Blender MCP for free by combining VSCode with OpenRouter's free models. These include google/gemini-2.0-flash-thinking-exp:free, deepseek/deepseek-r1-distill-llama-70b:free, qwen/qwen2.5-vl-72b-instruct:free, and others. This approach gives you access to powerful AI-assisted 3D modeling capabilities without any cost.
To use Blender MCP with local models through Ollama:
ollama pull <model_name> to download your desired model, such as ollama pull llama3 or ollama pull qwen2.5:7b.ollama list.http://localhost:11434 (Ollama's default address).Start creating with Blender MCP today and experience the power of AI-assisted 3D modeling.